Wednesday, December 19, 2012

We interrupt regularly scheduled programming...

I've been sewing up a storm recently. You know, 5 days until Christmas and all that, and gifts still to be made. Yesterday afternoon I basted a small (27" square) quilt for my guild's lovey donation last night (more on that in a later post). I taped the backing to the tile floor in my sunroom, and asked my almost 4-year-old to help. Because, well, he was going to "help" regardless.

He added pins to the edge of the batting while I did the actual pin basting. Then, as I was trying to quickly quilt the little lovey quilt (T minus 5 hours to the event!), he said to me, "Momma, I want to make a quilt for my cousins for Christmas."

How could I turn down a question like that?! Change of plans! The lovey could wait (though I did finish it in time...thank goodness for small quilts).


I let him pick out whatever fabrics he wanted. He went heavy on the greens, his favorite color. I cut 3" squares, asked him to arrange the squares, and then he sat on my lap for the actual sewing. His job? Raising and lowering the foot, and pressing the needle up-down button. We cranked out a little 16-patch, which honestly was about as much as his attention span could handle.


love that he wanted to make a quilt, and I love that he wants to give it away. Here's to getting him hooked on quilting early in life!

While I was adding the backing, he decided to "make" another quilt, this one using masking tape. Apparently taping the backing to the ground for basting had inspired him. Here's his second "quilt:"

Now back to my sewing...

One more thing: an update to the recipients of my 12 Days of Christmas giveaway. Did you know that Monday was the last day to mail things in the U.S. for them to arrive guaranteed by Christmas? Well, somehow I missed the memo. So when I went to my post office Monday, the line was OUT.THE.DOOR.

Now, I love you all, but not enough to wait in a line like that for something that really didn't need to arrive by Christmas. Or make everyone else's wait in that same line longer. So I am headed back tomorrow to actually mail them. Here's to a shorter line! Thanks for your patience.


Sunday, December 16, 2012

Naughty or Nice? (Stocking tutorial)

I'm happy to report that I have something else to cross of my "make before Christmas" list! 

And I've made it into a tutorial in case you'd like to make one yourself. 

The stocking measures approximately 9" (across the cuff) by 22" long. The cuff is made separately and attached at the end. I have a bag full of red, green, gold, cream, and black prints that I've been using to make stockings for 5 or so years; last year I specifically bought a few prints from Basic Grey's Jovial collection for Moda (LOVE IT!) for my sister and her husband's stocking. I used these same prints for my new nephew's stocking above. 

So let's get started. 

You'll need:
13" x 25" piece of muslin
13" x 25" piece of backing fabric (I used black corduroy)
13" x 25" piece of interfacing
13" x 25" piece of fabric for the cuff (I used black velveteen)
3/4 yard of lining fabric
An assortment of strips and scraps at least 13" wide (I have cottons, corduroys, and velveteens)
Coordinating ribbon pieces at least 13" wide

The stocking front is made by piecing on a foundation, in this case, a piece of muslin. Position the first colored strip (mine was gold) at the top of the muslin, and lay the second strip (red) face down on top, matching raw edges. Stitch using a 1/4" seam allowance.


Press the second strip down. Continue adding strips in the same manner. I typically use about 8 different strips per stocking front, varying widths. I also use a wider piece at the top and bottom, because I just like the look of not having a skinny strip along an edge (and in the case of the top cuff, it gives you more leeway for positioning the cuff. More on that later.).

Here is what my pieced front looks like.
If you'd like to add ribbon (grosgrain or velvety works better than silky!), pin a ribbon across the stocking front. Position it along a seam to help ensure it looks straight. Topstitch along both edges of the ribbon.

My sewing machine (a Janome 6600) has a bunch of fun stitches on it. I like to use a couple to embellish some of the fabric strips. This one looks a bit like a snowflake.

A line of stars!

Pin the stocking template in place (the one linked here is a nicer version of my well-loved and oft-used paper bag version below!). Cut out around the stocking. I like my stockings a bit generous, so I treat the pattern as the stitching line and cut accordingly to include a seam allowance.

Position your cut-out stocking front on the stocking back fabric, WRONG SIDES TOGETHER. Very important, or your stocking backing will be backwards. (You could also just flip and trace the template, but because I'd cut out generously around the shape, I wanted to trace my stocking front to ensure the two matched.) Cut out the stocking back, and then cut out a back stocking shape from interfacing for a little added stiffness.

Layer the interfacing, stocking back right side up, and stocking front right side down. Pin together. See how the toe of my stocking doesn't have any muslin? That's because I tried to skimp and use a smaller piece of muslin. Don't do that. It doesn't affect the finished stocking, but I think consistency is nice!

Sew around the outer edge, leaving the top open. Clip the curved edges if needed. square up and trim the upper edge of the stocking. I always start out making my stockings longer than necessary; then I can choose exactly where to trim it to. This is helpful if your top stripe isn't as wide as you'd hoped; you can trim the stocking length as needed to show/hide one of your top fabric strips. Turn right side out. Here is mine before trimming; I cut off about 3" from the top.

Fold your lining fabric in half, position the stocking (or stocking template) on top, and pin. Cut out stocking shapes through two layers (they'll be mirror images, as they should be).  Don't you love this print? It's from the Jovial collection. To me, it was the perfect combination of classic and contemporary. Don't forget to trim the top of the lining pieces to match your stocking.

Layer these two pieces right sides together and stitch around the outer edge, leaving the top edge open AND leaving an opening along the bottom for turning.

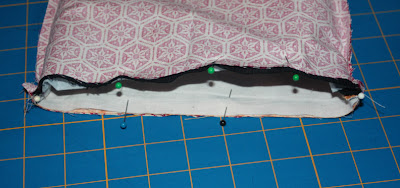
Slide the outer stocking inside the lining, with right sides together. Match raw edges, match side seams, and pin.

Stitch along the top edge.

Turn right side out through the opening in the lining; stitch that opening closed.

You can stop here if you like; it's a pretty nice looking stocking. Or you can add a cuff (embroidered with a name or not...your choice).

I don't have the skills or the equipment to embroider, but I've befriended a talented embroiderer at my local quilt shop. I like to give her plenty of fabric to work with. Here, I gave her a piece of black velveteen approximately 13" x 25" and asked her to start the name 5" in from the left side. That's the side the seam will be on. If you're making a cuff without an embroidered name, skip over the steps that discuss centering--definitely less fuss!

I trimmed the cuff piece to be 11" wide; this will create a cuff that is about 5" wide. I left the length for now. Fold the cuff in half lengthwise so the top raw edge matches the bottom. Stitch along the long raw edges to make a tube.

Turn right side out and press so the name is centered top to bottom on the tube. Measure the name and mark the center point with a pin. Measure the top of the stocking and mark the center point with a pin.


Line up the two center pins and slide the cuff down over the stocking, into its approximate final position (this is a personal preference thing--you'll ultimately need to handstitch the cuff to the stocking top, so the cuff can just barely overlap, or overlap a few inches, which is how I like it). Fold the rest of the tube under the stocking, so the cuff is in place.

 Trim the excess from the back cuff to 3/4" past the stocking edge. Trim the excess from the front cuff to 1" past the back cuff. 

Use pins on the front cuff to mark the point where the back cuff touches it. Press the raw edges of the front cuff into the tube, up to those marked pins.

Slide the raw edge of the back cuff into this pressed tube edge. Pin and stitch to secure. 
Slide the cuff over the stocking top, make sure it is straight, and pin in place. You can slide the cuff up or down to where the cuff fits best. Handstitch in place. 

To make the loop, cut a 2-1/2" x 13" piece of fabric (I used the corduroy from the backing). Press one long edge over 1/4". Press the other long edge in approximately 3/4". Fold the finished 1/4" edge over the other edge, pin, and topstitch to secure. Fold the loop in half and machine or handstitch in place along the cuff seam. 

Fill stocking with treats and enjoy! I hope you enjoyed this tutorial

Here are all 3 stockings for this new little family:
(I'll be mailing James' tomorrow so that he has it in time for Christmas!)


p.s. Doing a very late Sunday link-up to Confessions of a Fabric Addict's Can I get a whoop whoop?!


Friday, December 14, 2012

Log Cabin Love

It's no secret that I'm a huge fan of log cabin blocks. My first post about a quilt I made was a wonky log cabin. I stitched another log cabin quilt (not wonky this time!) all out of polka dot fabric. I used variations for hotpads and a beach bag. You get the picture...

So when Fons & Porter contacted me and asked me to check out their new eBook, Build Your Best Log Cabin, I was happy to say yes.* Mmm...more log cabin ideas for inspiration!


This 24-page eBook includes photos of eight different quilts, both antique and current, serving up examples in various block styles. I really enjoyed seeing examples of so many different ways to approach this block. My favorite quilt was designed by Ricky Tims, featuring his hand-dyed fabrics, though the antique Courthouse Steps quilt was a close second.
Ricky Tims' quilt; photo from Build Your Best Log Cabin
The quilts are divided up into three categories: Traditional, Courthouse Steps, and Chevron. Handy charts for multiple block sizes and a variety of layout options provide the tools to make each design your own, which I love, since I usually can't help but add my own twist when I'm following a pattern. And the patterns themselves are well written; as someone with pattern writing on my resume, I can be a bit picky about that. Sprinkled throughout are the helpful tips for which Fons & Porter magazines are known, as well as useful lessons (with step by step photos) on bobbin trapunto, adding piping, and creating lumpless binding.

Blog readers typically drawn to quilts made from more contemporary prints in light, airy settings may find the photos a bit dark. I do think that is offset by the number of quilts made from solids, which demonstrate an understanding of what appeals to many of today's quilters (particularly those in the blog world). If you love log cabins and the infinite possibilities this classic block offers, you'll find this eBook to be a useful reference tool, no question. It's worth adding to your e-library. (Do you have one of those yet? I do...it's a folder on my desktop called "quilt pdfs." Original, isn't it?)

And the good news is that this eBook is free, so you can check it out yourself! Click here to access a copy of it, and then save it to your computer for your next log cabin project. Note: The link asks you to enter your email address to download the eBook. This also signs you up for the Fons & Porter email newsletter.
Enjoy!


*Disclaimer: I am not receiving anything from Fons & Porter to review their eBook. The opinions stated above are my own.

...And a partridge in a pear tree...

The clock strikes midnight, and my 12 Days of Christmas giveaway has ended!
Courtesy of Mr. Random, the last winner for the everything-but-the-kitchen-sink bundle is:
Congratulations, ga447! Looks like you have a few more scraps to play with now. 
I've sent you an email for your mailing address.


My plan is to take a trip to the post office on Monday, so if you are one of the winners, start watching for your package sometime next week (well, except you international winners; I'm thinking yours will take a little longer). 

Thanks to everyone as well for satisfying my curiosity about why you entered which color day giveaways, etc. I loved reading everyone's comments these past 12 days, getting to know you a bit better. I  am flattered that you all visit here as frequently as you do--please keep coming around to see what I have to share (including a stocking tutorial this weekend)! 


Thursday, December 13, 2012

Day 12: Everything but the kitchen sink (and cream/beige winner!)

It's the last day of the 12 Days of Christmas giveaway! I hope you've had fun seeing the results of my thinned out stash and reading everyone's comments even if you weren't/aren't one of the 12 winners. I know I've had fun!

The winner of the cream/beige bundle is:
Congrats, Abbigail! I've sent you an email


I've been calling this last group the black/white/multicolored bundle, but I might as well call it "everything but the kitchen sink" instead. It started as blacks and whites, and then sort of ended up as the home for whatever was left that was leaving me feeling indecisive.

To enter to win the everything-but-the-kitchen-sink bundle, please leave a comment to satisfy my idle curiosity: I didn't have the same number of comments every day of this contest, so you didn't all enter to win every bundle. Did you only comment on certain colors that you really wanted? Or some days you just didn't make it online? Or....? Just wondering!  The giveaway will remain open until 11:59 EST tonight (December 13th). I'll post the winner's name tomorrow and then we'll be done.
Good luck!


p.s. If you're wondering what this post is about, visit my original post here

Wednesday, December 12, 2012

12 on 12/12/12

Inspired by Victoria's post, I've created my own 12 on 12/12/12.

12 large string blocks, ready to be pieced for one of my Superstorm Sandy donation quilts. 
I'm thinking turquoise sashing?


My new Big Shot and 12 freshly cut hexies 
(thanks to winning the Tula Pink Sew Along over at Sew Sweetness!)


12 fabrics and ribbons for my new nephew's Christmas stocking


12 beloved New York Beauty blocks. 


 12 favorite books from my library


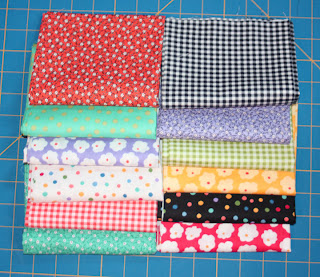
12 piles of fabric ready for new homes from my 12 Days of Christmas giveaway
Tomorrow is the last day!


12 fabric bins that aren't overstuffed anymore, courtesy of the above giveaway


12 of my favorite Shades of Grey charm squares, ready to become a quilt in January 2013


12 shiny new Aurifil threads, again courtesy of the Tula Pink Sew Along


My Christmas present to myself for January--finally sewing these 12 flannel and wool prints into the snuggly snowman quilt that I intended to make 4 years ago!

12 Patchwork Pals fat quarters (from Red Rooster) that I'm just itching to sew into a sweet little girl's quilt

And finally, inspiration in one of my favorite forms: 12 holiday M&Ms

Happy 12-12-12 day! And Happy Birthday to my dad! A pretty cool birthday to have!