Wednesday, November 28, 2012

Stocking Central

It's that time of year again...you know, the few weeks leading up to Christmas, when in addition to all the gift shopping, tree decorating, and cookie making, you finally settle down to start churning out stockings {insert your last-minute Christmas project here}. I admired all of the pre-December holiday efforts on blogs (Christmas in July, 100 Day Hustle, etc.). But when those started, I was busy with other projects; plus, the deadline just wasn't close enough to feel real.
The clock is ticking now, though!

I am the (self-)designated stocking maker in the family. About 6 years ago, I made these stockings for me and my husband (forgive the photo...evidently I'm so proud of them that I've never actually taken a photo of them hanging on a fireplace).

I made these stockings using velvets and silky fabrics that my grandma gave me. I love them, but nine stockings later, I've learned some dos and don'ts for stocking making, and most of the don'ts came from these.
And, the first year we used them, they weren't quite done yet (you're not surprised, are you?). So the cuffs were attached with pins. Which I forgot to warn my husband about before he reached in to see what Santa had brought. Oops! He's very careful now.

My sister-in-law saw these and asked if I would make stockings for her kids. Of course!
Her three kids blossomed to five, so that was two more stockings. I really need to get a photo of all 5! These were made the same way as mine; I traced my childhood stocking, pieced fabrics together to be larger than the template, used the cool stitches on my sewing machine to embellish, added a corduroy back (stiffer than faux velvet...a better choice for good hanging!), and then topped it off with an embroidered wool cuff.

Two years ago, my sister got married and requested stockings. Then my sister-in-law got married and asked for stockings too. So last year, I made my sister's, using the same technique:

And tried something different for my sister-in-law. I had been saving this free Denyse Schmidt pattern for a couple years, planning to use it for my own future kids.
I love how these turned out!

So, onto this year. I am making the more traditional stocking with the black cuff for my new nephew (so it matches his parents' stockings). And I am making the Denyse Schmidt stocking for my two boys out of this Ready, Set, Snow fabric, bought last November in a fit of optimism.
This year it's happening though. And a matching tree skirt.
The sewing starts today. Does having the fabric and a plan count as a WIP? I think it does, so I'm linking up to WIP Wednesday at Freshly Pieced. I'll be back with an update later this week!

One more thing: To raise the stakes a bit, I'm competing with my husband. We have a double-sided fireplace in our new house, and neither side has a mantel. He's working on that, I'm working on the stockings to hang on it. Who will finish first???


Tuesday, November 27, 2012

Trying not to shout it from the rooftops...!

Okay, I'm going to anyway! 
Do you remember this quilt?
I am so excited! I found out this morning that it won 1st place in the Tula Pink Sew Along!!!!

Tula chose it herself, and I could barely believe my eyes when I read the email. All of the projects entered in the contest were amazing. I entered just because I wanted an excuse to try out this LOVE pattern; I never expected to win! You can see the other winners and the post about the winners here. Thanks so much to Sara at Sew Sweetness for hosting the Sew Along, to Tula, and to all of the sponsors of the contest!

I'm just going to go sit in my happy place for a little while. Which may or may not be at my sewing machine. :)

p.s. I have been cleaning out my studio and I'm going to do a 12 Days of Christmas Giveaway starting December 1st. Be sure to stop back and enter!

Monday, November 26, 2012

Winner! and Superstorm Sandy block update

Thank you to everyone who left such nice comments on my Holiday Lane Blog Hop post. The blog hop continues through November 30; click here to see each day's schedule so you can check out more pillows.

The random number generator chose the following:
which is Judy! Congratulations...you've won the Flurry charm square pack. 
Judy, I've emailed you for your mailing address.

Since posts without photos can be a bit boring, I'm combining a Superstorm Sandy block update here as well. THANK YOU! to everyone who has sent me blocks:
Elizabeth
Julianne
Jenny
Karen
Megan
Betty (my 3rd grade teacher!)
Lindy

I was so eager to open the envelopes that I was not good about noting who sent which blocks, so this is a generic thank you. All of the blocks I've received have been lovely. I spent a little time this morning playing with layouts and getting a feel for what all I have. Here are some photos. 

String blocks
I love string blocks because you can use almost any fabrics, regardless of whether they match, and the result turns out great!

Homespun blocks
If you read my Holiday Lane post, you know I'm a fan of homespun plaids and such. I love how these look! This will be such a cozy quilt.

...and isn't it interesting how much layout makes a difference? I tried putting the Courthouse steps block in the center. The layout above works so much better, don't you think?

Nine-Patch blocks (16 more on their way as we speak)
These are not laid out either; I'm waiting for the others to arrive and then will mix them up. These will make a great scrappy quilt, similar to the one my sister had on her bed growing up. Good memories!

Random blocks.
These haven't been laid out yet; I just put them up on the design wall to take a photo so I could start thinking about what to do with them. Great, aren't they?

**If you are still planning to send me blocks, can you please email me or leave a comment below so I know something else is coming? I'm hoping to start assembling quilt tops soon.** 


p.s. Linking up with Quilt Story's Fabric Tuesday today!


Wednesday, November 21, 2012

Take a walk down Holiday Lane...


Welcome to my blog! 
Today I'm participating in the Holiday Lane blog hop with the lovely Madame Samm at Sew We Quilt. Thanks to our super-organized cheerleader, Pauline from Quilt'n Queen and Jillily
Studio for the great pattern!

Here's a photo of my finished piece; keep reading to read how I'm obsessed with Christmas villages, why my project is flat rather than stuffed, and how to enter the giveaway I'm offering.


When I first saw this blog hop, I knew I needed to be a part of it. My actual (porcelain) Christmas village spans a banquet table each December, complete with little evergreens, a mini nativity scene, and battery-powered street lamps. My high school boyfriend (who had his own collection!) got me started 17 years ago, and I've added to my village pretty much every year since. My favorite piece? A church that plays Silent Night that used to belong to my grandpa. 

My first fabric village was this nativity scene, which I recreated from a Christmas card my family received while I was in college. 
I sort of made this up as I went along, using fusible web and a lot of embroidery floss. I didn't know as much about sewing, and I made the border (cropped out here) out of batting. Hee hee. I just liked the texture...
This pillow still sits on my mom's couch every Christmas season. 

But back to Holiday Lane. You can see now why I wanted to be part of this blog hop. 
I also knew exactly what fabrics I wanted to use: a collection of homespuns and flannels that I'd been hoarding. My style isn't very "country," but there's something about a Christmas village 
that simply begs for homespuns and plaids.

Here are the options I started with: 

I auditioned my fabrics and chose the following:

Here it is pieced and appliqued, ready for some stitching embellishment. 
As I stitched, I decided some of the houses needed extra detail, so I added a few more windows 
and doors. 

Take a look at some of the stitching details up close:
I used some of the fancy stitches on my Janome to buttonhole stitch the outside edges of each house, and a cool icicle-looking stitch on the pine trees. The rest of the stitching was free motion quilting.
 Wavy lines through the snowy roofs, light gray zigzags creating "glare" in the windows,
Windowpanes on the windows, and back and forth stitching on the houses and doors.

Here it is as a pillow:
I made an envelope-style pillow and then a muslin pillow form. The muslin pillow form is too fat; you can't see all the houses. So until I redo that, the "pillow" is a wall hanging!

When I fix the pillow form, I think I'll also add some quilting lines into the red border, as it's too floppy and wrinkly compared to the rest of the piece. 

So there's my story! Time to get my Christmas village out to match my pillow...

Now that you've visited me, make sure to check out the other blog hop participants today. I can't wait to see what other quilters did with this pattern!

Wednesday November 21

What's left? How about the giveaway!?!?
This charm square pack of Kate Spain's Flurry collection for Moda could be yours. Just in time for a last-minute holiday project! 

To enter:
1. Sign up as a follower or to follow my blog by email in the right hand sidebar, and then leave a comment to let me know you did so. (If you're already following, thanks! You're the best! Leave a comment here letting me know that.)
2. For a second entry, click here and like my Facebook page, and then leave a comment here letting me know you did so. 
3. Today is my birthday. So just for fun, in your comment for #1 and/or #2, tell me your favorite kind of birthday cake. I made myself pumpkin Kahlua cheesecake on Sunday. Yum! (And yes, I make my own birthday cake. I enjoy baking; my husband doesn't. I get what I want, which is not a store-bought cake, so I'm happy, which means he's happy too. Win-win!)
4. The giveaway will be open until 11:59 EST on Sunday, November 25. I'll use random number generator to select a winner from the comments on November 26. Check back on the 26th to see if you won!

Monday, November 19, 2012

Gobble Gobble! Quick Turkey Tutorial

Late last night, I remembered that I made this cute turkey bib for my oldest's first Thanksgiving.


My youngest, now 15-months, isn't much for drool bibs anymore, but I knew I could make one for my new nephew, who is just 2 months old.

A while back, I bought a 10-pack of colored terrycloth bibs. Today, I went out to buy more fusible web, as I'd run out while working on a project over the weekend (don't you hate that?!?!).

Then I got started. This was so quick and easy to make that I thought I'd share it as a tutorial.

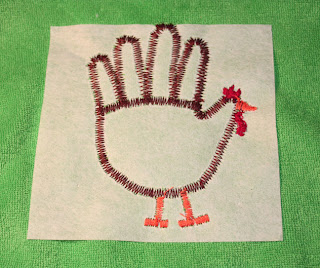
Remember tracing your hand as a kid and turning it into a turkey? That's the basis for the idea here. The turkey in the bib above is a rough tracing of my munchkin's hand. I simply used that same shape again.
 (I scanned the hand shape in and you can download it here if you don't have a little hand model at your house.)

I drew a line across the bottom of the fingers (you'll see it on the scan) and then traced each finger and the palm/thumb shape separately onto fusible web.

Cut out the shapes loosely around the tracings and fuse to the wrong side of your selected fabric. The key here is to pick very small prints, because the shapes are tiny, and once you zigzag stitch around them, the area of fabric you see is even smaller.

Here's my big tip for fusible web: Before cutting the fused fabric out on the drawn line, begin pulling the paper off the web. Pull far enough that you lift up the edge of the paper inside your shape. Then cut out your shape (you can press the lifted edge down so that you cut accurately).
Why? So often when I remove the paper after I've cut out the shape, I end up fraying and/or distorting the edge of my fabric shape. So frustrating! So by starting to peel beforehand, you avoid this.

Arrange the shapes centered on your bib and fuse in place.

Cut a piece of stabilizer larger than the turkey and pin to the back of the bib. Select a tight and medium-length zigzag stitch, thread color (I used brown), and stitch around all edges of all turkey pieces.

 I used a narrower zigzag stitch and orange thread for the feet.

To do the beak, comb and wattle (had to look that one up--couldn't remember what it was called), I adjusted stitch width as I sewed. So, for the beak, I started with the longest zigzag stitch and sewed a few stitches. Then, while the needle was up, I moved to a medium-length stitch and sewed a few more stitches. Then I moved to a very short stitch and made the tip of the beak. I used a similar technique for the comb and wattle.


Here you can see the backing, with the stabilier. After I finished appliqueing, I trimmed the stabilizer to just around the turkey shape.
And you're done!

My finished turkey:

The finished bib:

I popped it in the mail today; my sister should receive it on Wednesday. Her little family of three is having Thanksgiving with her in-laws, but I can't wait to see her little turkey (and his bib!) over the weekend! 

 To everyone celebrating turkey day this week, Happy Thanksgiving!


p.s. Don't forget to check back here on Wednesday for my Holiday Lane pillow post (and giveaway!), part of the Holiday Lane blog hop at Sew We Quilt.

Thursday, November 15, 2012

Cathedral Windows, Done!

Whew! Just under the deadline, I was able to slide my last few blocks and sampler top into Pellon's Cathedral Window Challenge.

You can read about my first four blocks here and here.
Here are my last five blocks:

Block 5

Block 6

Block 7...this is probably my favorite of the bunch, both the design and the fabrics. 

Block 8...The original pattern called for a thin inner border and a scrappy outer border, but I stayed with a simpler look. It also helped to straighten up the block--LOTS of fabric layers here, so it got a little wonky pretty quickly. I also put this one off to last because it seemed like the most work. It was, but I enjoyed it anyway.

Block 9...definitely the quickest! Just fusible web and pattern pieces. :)

I struggled a bit with how to make these into a top. As a rule, I'm not a huge fan of samplers. I knew I wanted something more than just basic sashing. I hit on the idea of making each block into a square within a square so the blocks appeared to be set on point. I chose red and black for the triangles because some of the blocks read dark and some don't. (I also had trouble choosing a red, because the two fabric collections I used here had very different shades of red in them, so I went with a middle of the road red to match neither!)
The first layout looked like this:
But it just seemed too ordinary.
 (don't mind the bad picture above...it's just from my phone, taken for my reference, as I feel like you get a better view of your layout on a camera/phone/screen. Also notice that block #8, the one I put off, hadn't been done yet.)

So I tried this layout instead and liked it better.

Of course, this meant that I had to sew lots of triangles together rather than using black squares and larger red setting triangles, but that's okay! I think a big part of becoming a better quilter is auditioning design and placement ideas.

Here's another look at the final top. I may ultimately put a scrappy border on it, but I haven't decided yet. I have no idea how to quilt this because some of the blocks have SOOO many layers to them.
It was a fun challenge! You can see other people's blocks and sampler tops here on Flickr.
I'm definitely planning to go back and make another Cathedral Window project (pillows, maybe? at some point), but for now, I'm putting this all aside to get started on some Christmas stockings!


p.s. Speaking of pillows, be sure to check back Wednesday, November 21, as that's my day for the Holiday Lane pillow blog hop through Sew We Quilt and I'll be having a giveaway as well.
p.p.s. Linking up with Confessions of a Fabric Addict's Can I get a whoop whoop Friday!


Monday, November 12, 2012

Sucking a 3-year-old into sewing!

I pinned this on Pinterest last winter and have been eagerly waiting to use the idea ever since. This past week, I got my chance.
My 3-year-old came to me with this:

Time to make a monster!

I made the hole larger and sized my fusible web around it.

I chose a red batik for the mouth and made teeth by using some leftover white binding strips. I just stitched the outlined edge of three pointy teeth on it and then trimmed outside the stitching lines. I really wanted to use white felt. I used to have white felt. I did some cleaning out because I.have.too.much.stuff and tossed the white felt. I was really kicking myself and will never throw anything out again. (And yes, I realize that I could have bought felt, but this was one of those "it's 10 pm and I'm going to finish this project tonight, darn it!" projects.

It felt weird to be ironing the fusbile web to the right side of my project. 

I made the eyeballs the same way I made the teeth. Still missing that white felt...

I fused the red mouth/teeth inside the hole and hand stitched around the hole edges to further secure. I handstitched the eyes in place as well. 

He's a big fan of his monster knee and couldn't wait to show it off at pre-school!

Tonight, while folding laundry, I came across this:
A second monster was immediately requested. 

And now we have zero pairs of jeans without holes. My husband, once a boy himself, suggested that the best I can hope for is that our sons each have one nice pair of pants that are hole-free to wear to church. I grew up with a sister. We had no holes! I think I'm going to get pretty good at monsters...

My other small sewing project for the week also involved my 3-year-old. I caught him one night liberating fabric scraps from my studio to make a "pillow" for the stuffed animal du jour. I am all for encouraging an interest in fabric, so I offered to make a sleeping bag for said stuffed animal of the week. He agreed, helped me pick fabric, and was thrilled with the results. Then the next day he reappeared with his new Willie (Northwestern's mascot) and requested a second sleeping bag.
Willie's of course is purple.


p.s. As much as I LOVE getting comments from all of you, it absolutely melts my heart when I get a compliment from him. He will walk into my studio, look at what's on my design wall, and say, "Momma, that is bee-yoo-tiful!" Every. Single. Time. So sweet!