Monday, December 23, 2019

Gift & Wine Bag Tutorial

Welcome! I'm excited to be the last stop on Benartex's 12 Days of Christmas Quick Gift Project Hop! If you missed the other 11 days, scroll to the bottom to find the links.


Whether you're going green or just short on wrapping paper, fabric gift and wine bags are a great solution for paper gift wrap. These go together so quickly that you can still stitch up a few bags before the holidays; you can also sew some after the holidays to get a head start for next year!


I chose to use the icy prints in the Pearl Frost collection from Kanvas. These prints have a pearlescent finish, so the shimmer, adding a little extra holiday sparkle. I love the variety of blues! The snowflake print, which you'll see in the gift bag, is my favorite. 

I have two quick tutorials to share with you today: a fabric gift bag and a fabric wine bag. The wine is not included; you'll have to provide your own. :)


Making the Gift Bag: 
Bag finishes at approximately 10" x 14" x 5"

You'll Need:
  • 1/2 yard each fabric
  • 1/2 yard lining fabric
  • Approximately 40" of 3/4" wide ribbon


Cutting:
From outer bag fabric: 
Cut (2) 15" x 20" pieces

From lining fabric:
Cut (2) 15" x 20" pieces


Step 1 Place the (2) 15" x 20" outer bag pieces right sides together and pin along both long sides and one short side. Sew along pinned edges, leaving top edge open. 

Step 2 Repeat with the (2) 15" x 20" lining pieces. 

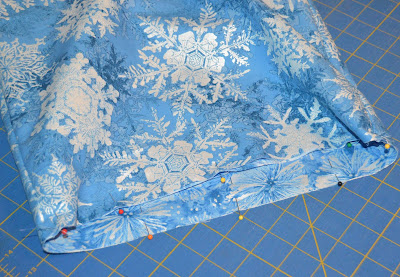
Step 3 Cut 2-3/4" squares out of the (2) bottom corners of both the outer bag and lining (lining shown below). 

Step 4 Align the side and bottom seam where you just cut and pin raw edges. Stitch along the the using a 1/4" seam allowance to box the corner. Repeat on remaining lining corner and on both outer bag corners. 

Step 5 Turn outer bag right side out. Slide lining into the outer bag with wrong sides together. Align side seams and pin along the top edge. Stitch around top edge using a 1/8" seam allowance. 

Step 6 Turn bag lining side out. Fold stitched top edge 1/4" to lining side and press. Fold top edge over an additional 2" and press as shown. 

Step 7 With bag still lining side out, stitch along bottom of folded edge 1/4" from fold as shown, creating a casing.

Step 8 Turn bag right side out. Use a seam ripper to open 1-1/4" of the seam in the casing on both sides of the bag. 

Step 9 Cut the ribbon in half and using a safety pin, pass (1) 20" ribbon piece through the casing starting and ending at the left side opening. Tie the ends in a knot. In the same way, pass the remaining ribbon piece through the casing starting and ending at the right side opening. 

Tuck your gift inside (bag is large enough to hold a shirt, several books, a fat quarter bundle, etc.). Cinch ribbon to close bag. Give your gift!


Making the Wine Gift Bag:

Simple Wine Bag: 
You'll Need:
  • 1/2 yard fabric (includes both lining and outer bag)
  • 15" of 1/2"-wide ribbon (optional)
Cutting:
From fabric: 
Cut (2) 11-1/2" x 18" pieces

Step 1 Fold (1) 11-1/2" x 18" piece in half right sides together so it measures 5-1/4" x 18". Using a 1/4" seam allowance, sew along one short edge and one long edge, leaving the top short edge open. Repeat for the lining piece, leaving an opening along the short edge for turning (see second photo).

See stitch lines shown in digital pink--leave opening for turning later.

Step 2 Turn outer bag right side out and tuck inside the lining, aligning side seam and raw edges at the top. Pin to secure. Stitch around the top edge using a 1/4" seam allowance. 

Step 3 Turn the bag right side out through the opening in the lining. Sew the opening closed. 

Step 4 Tuck the lining into the outer bag and press the top edge of the bag. Topstitch along the top edge using a 1/4" seam allowance. 


Pieced Wine Bag:
You'll Need:
  • 1/8 yard each two different fabrics
  • 1/2 yard fabric (includes both lining)
  • 15" of 1/2"-wide ribbon (optional)
Cutting:
From each outer bag fabric: 
Cut (2) 3-1/4" x 18" pieces

From lining fabric: 
Cut (1) 11-1/2" x 18" piece

Step 1 Sew the (4) 3-1/4" x 18" outer bag pieces together lengthwise, alternating colors. 


Step 2 Follow steps 1-4 from the Simple Wine Bag to complete this wine bag. 

Insert a wine bottle, tie top with ribbon if desired, and bring to your next holiday party! 


Enjoy the holidays! 
If you're looking for more festive inspiration, check out this holiday quilt post

Procrastinating your wrapping? Need a little more fabric gift inspiration? 
Check out the other projects featured in the Quick Gift Project Hop!
12-Dec  Debby Kratovil 
13-Dec  Rachel Rossi 14-Dec  Ann Lauer 15-Dec  Stephanie Sheridan 16-Dec  Carol Swift 17-Dec  Pat Sloan 18-Dec  Julie Cefalu 19-Dec  Shelley Cavanna 20-Dec  Linda Leathersich 21-Dec  Charisma Horton 22-Dec  Cherry Guidry 23-Dec  Lisa Ruble - you're here!


Friday, December 20, 2019

Holiday Quilt Patterns

It's the holiday season, and there are so many tempting quilt patterns available, and only so many days to make them (on top of the cookie making, gift wrapping, carol singing, etc.). I've had a a lot of fun designing holiday quilt patterns this year--I haven't sewn them all (yet!), but it's wonderful to get a chance to "play" in all these festive fabrics, even if it's sometimes only digitally. 
Here's a rundown of the quilts I've designed and where to find them (some are free patterns to download; some can be purchased).


featuring Night of the Nutcracker by PBS Fabrics
Free pattern download here


featuring Handmade Holiday by Ampersand Design Studio for PBS Fabrics
Free pattern download here


Twirled Squares
featuring Night of the Nutcracker by PBS Fabrics
Purchase the Twirled Squares pattern here


featuring Scandinavian Christmas by The Tiny Garden for PBS Fabrics
Free pattern download here


featuring Flamingo Christmas by Lauren Lesley for PBS Fabrics
Free pattern download here 


featuring Christmas Peace by Amarilys Henderson
Free pattern download here


featuring Artful Snowflake by Paula Nadelstern for Benartex
Free pattern download here


featuring Uncorked by Another Point of View for Windham Fabrics
Purchase the Ribbon Weave pattern here


featuring Candy Cane Lane by Whistler Studios for Windham Fabrics
Download the free pattern here


Which one would you make? 
Happy Holidays!


Thursday, December 19, 2019

Introducing Rhombi, featuring Playroom!

My pre-Christmas sewing wasn't totally holiday focused. 
I got to play with these fun fabrics: from the Playroom collection by Mister Domestic for Art Gallery Fabrics. Aren't they sweet? 

As I've mentioned before, there's not a lot of pink in my house, so it's always fun to sew with some!

The quilt I created using the Playroom prints (plus Pure Elements Solids) is a new pattern I'm launching based on a log cabin block (and it's currently on sale--scroll down for more info). It sews up super quickly and at 45" square, makes a perfect baby quilt.

 I named it Rhombi--because a square is a rhombus and this quilt is full of squares on point (and yes, I had to double check the definition of rhombus--geometry was a long time ago!) One square = rhombus; multiple squares = rhombi!


Rhombi is featured in Art Gallery's Playroom lookbook.  Isn't the backing fabric adorable?!


A couple close-ups:

This alphabet print I used in the center is my favorite from the collection.

It's playtime!


This pattern is available as a downloadable PDF in my Etsy shop. Purchase it here. The pattern is 15% off through December 22nd, so grab your copy today!

Here are the yardage requirements:

See all of my available patterns here

Psst! Looking for more ideas for using Mister Domestic's Playroom collection? I'm hosting a quilt along in January 2020 featuring my Star Crossing quilt pattern. 
Here are a couple ideas of what it looks like in the Playroom prints: 


Stay tuned for more details about the quilt along! 


Tuesday, December 17, 2019

Artful Snowflake on a snowy day

Back in September, I was asked to design a quilt using Paula Nadelstern's Artful Snowflake fabric collection for Benartex. 


Would I like to work with Paual's gorgeous kaleidoscopic snowflakes? Yes, please!

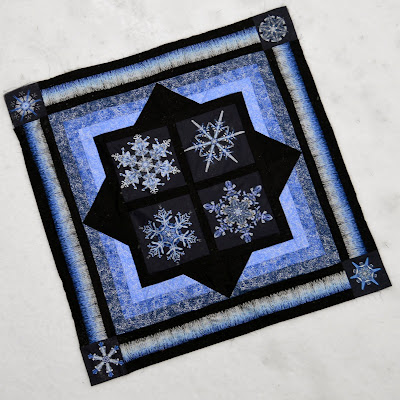
I used four of the large snowflakes as the focal point and then added icy blue borders to create Starry Night. The best part? This is a free pattern download available on Benartex's website.
Download the free quilt pattern here.

I also received the fabric to make the quilt. I finished the top a week or so ago but was waiting for a snowy background to take photos. I woke up this morning to a winter wonderland. Perfect!

It was a little windy while I was taking photos:


This quilt was made to be photographed in a snowy scene.
The quilt itself is quite easy to make--Paula's snowflakes do all the work. I can't wait to quilt this!


Friday, December 6, 2019

Ribbon Weave Wreath + 25% Sale

When I first designed my Ribbon Weave quilt, I knew I wanted to make a Christmas version because it looks like a holiday wreath. This week, it happened! I love the crisp modern look these colors create and can't wait to hang it up. (And I couldn't resist cutting some holly from the bush outside our home!)

The Ribbon Weave pattern is on sale in my Etsy shop: 25%. Use code WREATH25.

I used Windham's Uncorked collection by Another Point of View in Candy Apple, Blue Spruce and Sea Glass. I love the texture and the metallic gold accents. For background, I chose a white tonal with a little texture of its own--Windham's Bedrock in White.


To quilt this wall hanging, I used one of the decorative stitches on my Janome, bumped up to the largest size possible. I really like the scalloped look. 


The Ribbon Weave pattern is on sale through 25% off through Monday, December 9th. Purchase the digital pattern here and use code WREATH25.

Want to see other versions of my Ribbon Weave quilt? Read about the Gloaming version here and the Everlasting version here.

See all of the quilt patterns available in my Etsy shop here.