Tuesday, November 30, 2021

Strippy Improv Holiday Sew Along Part 3

Welcome back for part 3 of the Strippy Improv Holiday Sew Along! Today, I'm making star blocks. If you're just joining in, this is a very loose sew along--see the schedule at the bottom of this post--I'm making four different blocks and then talking about assembly. Totally do-able before Christmas!

Need the pattern? Find it here.
 

I originally made the gold star on gray, so I decided to play around a bit with my next couple star block samples.


I love how this one turned out--I am picturing a whole quilt of ombre-style star blocks! 
I'm going to turn this block into a potholder (or even just a mini quilt!). I had this dark teal Bedrock print in my stash and the golds pop off of it so beautifully!


Since I'm trying to stay in the color theme of my border fabric for this version of Strippy Improv Holiday, I decided to make a red and white striped star instead of gold. I think it'll look great opposite the red and white candy cane!

I had some help making these blocks thanks to a sick day from school. Actually, he did most of the work! He sewed the strips on for each star, and I handled the cutting, trimming and pressing. We made a great team!


These blocks stitch up so quickly - you still have time to make something before the holidays! The pattern comes with templates for five different blocks (ornament, snowman, tree, star and candy cane), as well as two layout options--a four-patch style wall hanging and a table runner.
Purchase the pattern here.

See you back here Thursday for another block! 

Strippy Improv Holiday Sew Along Schedule:

Thursday, November 18th - Intro and Fabric Selection

Tuesday, November 23rd - Make a block

Tuesday, November 30th - Make a block

Thursday, December 2nd - Make a block

Tuesday, December 7th - Make a block

Thursday, December 9th - Assembly

Tuesday, December 14th - Alternate options

Thursday, December 16th - Finishing

********************************************************************

If you're new here, welcome! I hope you'll stay and look around a bit. 
If you like what you've seen here, you can also find me:
To find all of my quilt patterns, visit my Etsy shop
Find me on IG here.
Find me on Facebook here.
Sign up for my newsletter in the right-hand sidebar or here
(You'll receive a free pattern for my Diamond Drama quilt (below) as a thank you!)

Tuesday, November 23, 2021

Strippy Improv Holiday Sew Along Part 2


Happy Sew Along Part 2! 

It's a block making day, and I'm focused on the tree block. It was fun to dig through my stash of green scraps to create trees in all different shades. 

Need the pattern? Find it here. If you missed the first post, find it here.

I chose the greens for my two planned projects based on the greens in the border fabric. 
So bright and more lime fabrics here: 


My snow globe border fabric actually only has sea green in it, so I experimented with something - using darker greens and little white strips of snow. What do you think? 


Here is my original tree from last year - I made it into a fabric postcard for our guild exchange. Super scrappy!

And here's a tree block where I played around with my machine's fancy stitches to make garland. If you go this route, do it before you add the applique cut out. 

A few tips for block making: 
  • Your strips only need to be long enough to extend beyond the drawn shape on the muslin. Don't feel like you need to cover the whole muslin square! 
  • Vary the angles of your strips - some leaning left, and some leaning right. This will add interest to your shape. 
  • If you choose to try snow on the tree like I did, make your white strips skinner than the green strips. 
Happy sewing!


And finally, a couple pics of my cuties and the tree blocks they made: 


Strippy Improv Holiday Sew Along Schedule:

Thursday, November 18th - Intro and Fabric Selection

Tuesday, November 23rd - Make a block

Tuesday, November 30th - Make a block

Thursday, December 2nd - Make a block

Tuesday, December 7th - Make a block

Thursday, December 9th - Assembly

Tuesday, December 14th - Alternate options

Thursday, December 16th - Finishing

********************************************************************

If you're new here, welcome! I hope you'll stay and look around a bit. 
If you like what you've seen here, you can also find me:
To find all of my quilt patterns, visit my Etsy shop
Find me on IG here.
Find me on Facebook here.
Sign up for my newsletter in the right-hand sidebar or here
(You'll receive a free pattern for my Diamond Drama quilt (below) as a thank you!)


Saturday, November 20, 2021

UFOvember: Rework!

When you make "quick corners" (on snowball blocks or flying geese, for example), do you save the trimmed off triangle pairs? Unless they're really tiny, I can't bear to throw them out, but they just sit in piles. And piles. And piles.

Star Bows leftover triangles

Opposite Directions lap-size leftover HSTs

So when Bobbie from Geeky Bobbin posted about her UFOvember plan, I knew it was time to pull out a pile of those neglected triangle pairs and rework them into a finished project! I even had the perfect time to work on it--our fall Great Lakes Modern Quilt Guild retreat!


I grabbed the leftover triangles from my Opposite Directions baby quilt (shown below) with a very loose plan in mind. Because the original quilt measured just 39" x 51", I knew I'd need to supplement with additional fabric to make another baby quilt. 

Opposite Directions quilt pattern

These leftover fabric triangles from my quilt are from Art Gallery Fabrics' Pine Lullaby Rediscovered collection, plus two colors of Pure Solids.


First:
Make HSTs. I chain piece these, which speeds the process along. Head over to IG and see my reel showing how I sew these as efficiently as possible. 

**One tip for chain piecing (and not just HSTs): Use your seam ripper to cut apart the threads between each stitched unit. Faster and easier than scissors!**


Then I trim them to a specific size. I find that it's easier to go slightly smaller with these HSTs made from loose triangles; that way you don't have to worry if your stretchy long triangle edges match up perfectly because you've got more wiggle room for trimming. 


Second:
Play around with layouts. I had leftover fabric from this quilt that I loved, so I knew I wanted to work it in (which also would allow me to make a larger quilt!). I started out by laying out all my HSTs just to get a visual on the size I was starting with (not very big, in this case...these HSTs are 2.5" square, so right here I' looking at approximately 22" x 34"). 


Then I switched to experimenting with layouts on the computer, because for me, it's faster. And I was on a mission to get this quilt done during my retreat! :)

My Design Ideas

1. This was my original idea. Those adorable critter heads were the backing fabric for my original quilt, and I thought it would be fun to fussy cut them and randomly insert larger squares into my HST pattern. 
But...it needed borders to be bigger, and I didn't have enough fabric for borders. Let's keep looking.


2. I'd also been thinking stars, making the HSTs into a scrappy low volume background, and still using the critter focal squares. I like this, but honestly, it was more work than I wanted to do. I wanted simple and striking.


3. Here's a star variation where the stars don't pop- using just HSTs and critter focal squares. I liked this design s as well, but that first design kept tugging on me. 


4. Ultimately, here's where I ended up - with my original design, but using leftovers of the white/black prints for the focal squares so I could use the critter fabric for a border. A good compromise, I think!


Third:
Start sewing! Since I was at a quilt retreat, I focused and stitched, and assembled this quilt over a two-day period. I joined HSTs into pieced sections around the focal squares, and then into larger rows.


The finished quilt top:


Fourth:
Bask in the great feeling that you used up some long-neglected triangles and created a quilt top. Now it's time to quilt and bind it before it lingers in a different UFO pile! :) 

And bonus - I'll be saving those rejected layout ideas for future HST project finishes!


Looking for more UFOvember inspiration? Check out a full month's worth of ideas!

  • November 1 - The Geeky Bobbin - http://geekybobbin.com
  • November 2 - Strawberry Creek Quilts - http://www.strawberrycreekquilts.com
  • November 3 - Katie Mae Quilts - http://katiemaequilts.com
  • November 4 - Pretty Piney Quilts - https://prettypiney.com/blog
  • November 5 - Mary Go Round Quilts - http://www.marygoroundquilts.com
  • November 6 - Exhausted Octopus - https://exhaustedoctopus.com/blog/
  • November 7 - Just Get It Done Quilts - https://www.justgetitdonequilts.com/blog
  • November 8 - By Hilary Jordan - https://byhilaryjordan.com/
  • November 9 - Sew Hooked on Treasures - http://sewhookedontreasures.com
  • November 10 - Sunflower Stitcheries and Quilting - http://www.sunflowerstitcheries.com
  • November 11 - Blue Heron Quilting - https://www.blueheronquilting.shop/blog
  • November 12 - Carrington Creates - https://cbear7774.wixsite.com/thatsthewayitseams
  • November 13 - Sarah Goer Quilts - https://www.sarahgoerquilts.com
  • November 14 - Better Done Quilts - https://betterdonequilts.com/
  • November 15 - Ashli Montgomery | Virginia'dele Smith - http://www.meandcoach.com
  • November 16 - Puppy Girl Designs - http://puppygirldesigns.com
  • November 17 - Lovingly, Lissa - http://lovinglylissa.com
  • November 18 - Art East Quilting Co - http://www.arteastquiltingco.com
  • November 19 - rjbosscher - http://www.rjbosscher.com
  • November 20 - Love to Color My World - http://lovetocolormyworld.blogspot.com/
  • November 21 - LynsAvenue - http://lynsavenue.com
  • November 22 - Quiltfox Design - https://www.quiltfox-design.com
  • November 23 - Maeberry Square - https://www.maeberrysquare.com
  • November 24 - Karen Bolan Designs - https://www.karenbolan.com/blog
  • November 25 - Tina1802 - http://www.tina1802.com
  • November 26 - Lazy Cozy Quilts - http://www.lazycozyquilts.com
  • November 27 - True Blue Quilts - http://www.truebluequilts.com
  • November 28 - The Scrappy Camper - http://www.thescrappycamper.com
  • November 29 - Sarah Ruiz Quilts - http://sarahruiz.com
  • November 30 - Lyric Art - http://LyricKinard.com

    If you're new here, welcome! I hope you'll stay and look around a bit. 
    If you like what you've seen here, you can also find me:
    To find all of my quilt patterns, visit my Etsy shop<<--use code BIRTHDAY21 for 15% off through 11/22!
    Find me on IG here.
    Find me on Facebook here.
    Sign up for my newsletter in the right-hand sidebar or here
    (You'll receive a free pattern for my Diamond Drama quilt (below) as a thank you!)


  • Thursday, November 18, 2021

    Strippy Improv Holiday Sew Along Part 1

     Welcome to the Strippy Improv Holiday Sew Along! 

    I don't know about you, but this time of year, I have big plans to finish projects before Christmas - either for gifts, or to decorate my house. And most years, very few get finished. I'd like to change that this year and I hope you'll join me. 


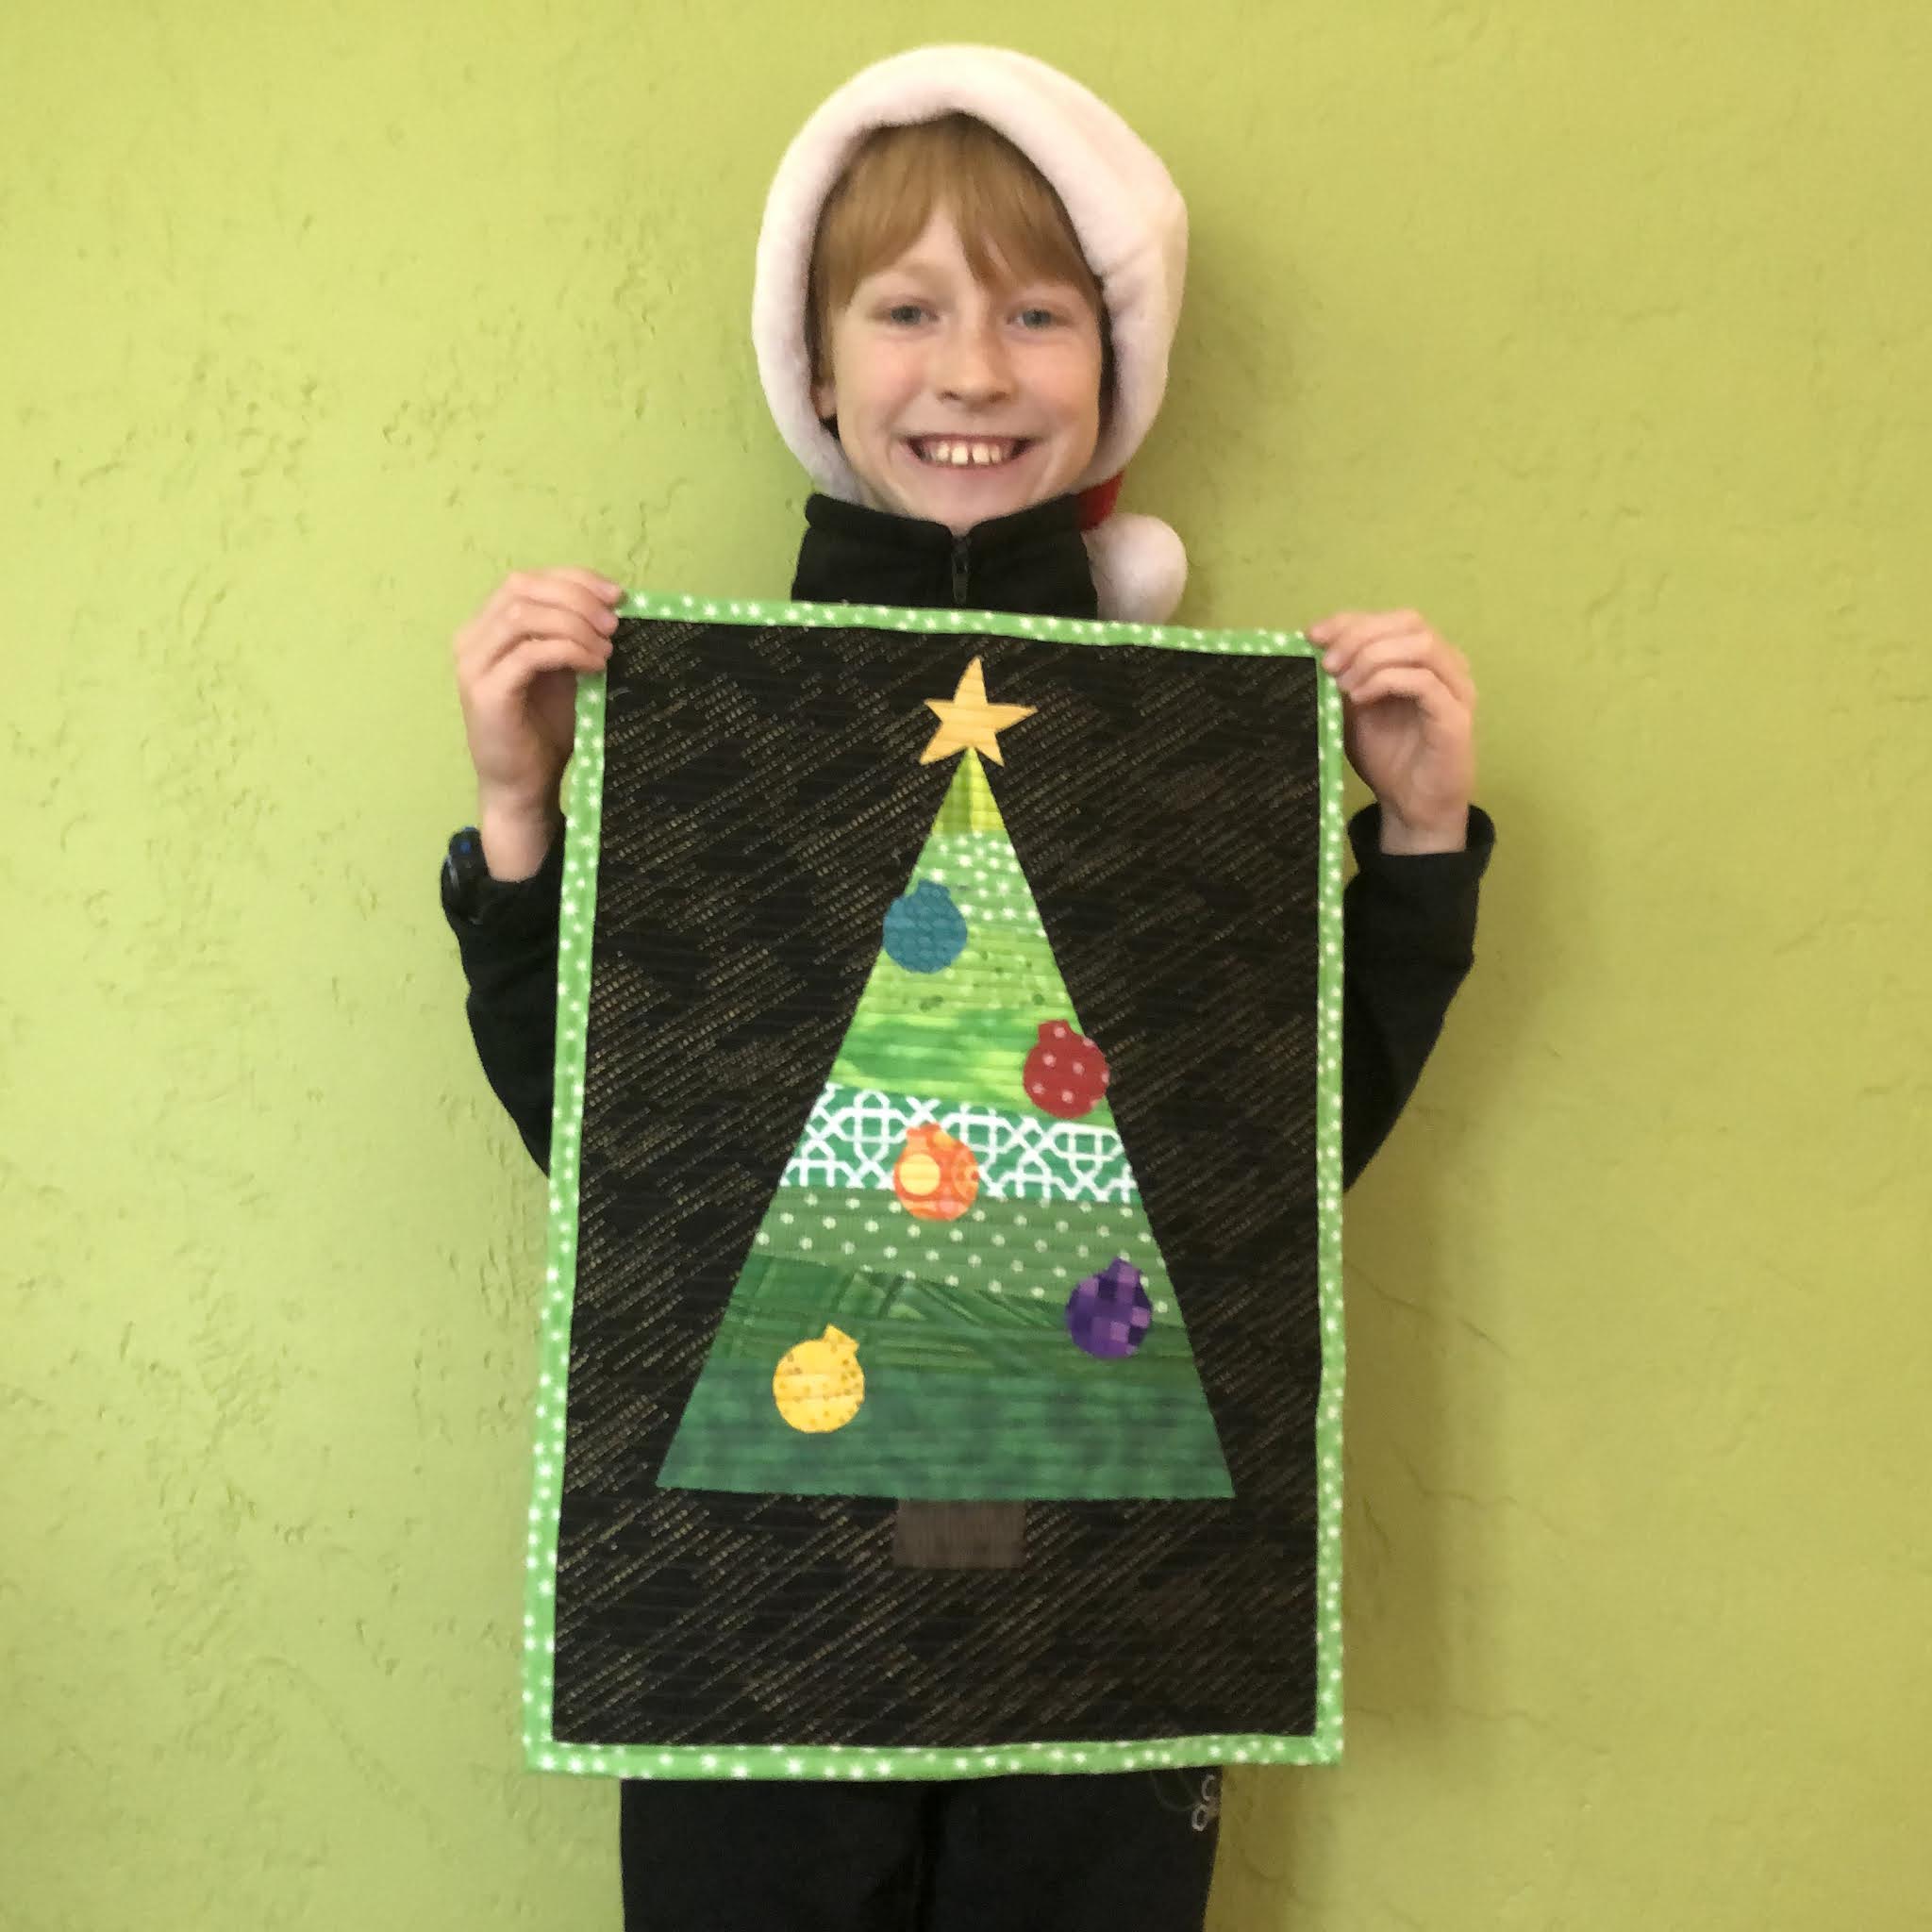
    The Strippy Improv Holiday pattern uses a combination of improv piecing (you can piece straight strips if you prefer) plus reverse applique to make your choice of five different block designs. The pattern includes options for a table runner or wall hanging finish. Since either one is a smaller project, you'll even be able to quilt and bind it before December 25th! Here are the blocks:


    Back to the Sew Along: I'm hosting the Strippy Improv Holiday Sew Along to help nudge us all along to a holiday project finish. Keep reading to see the schedule. You choose your blocks and your layout. I'll provide encouragement, tips and photos here on my blog, on IG and on Facebook on each of the dates listed. Together, we can do this! 

    Purchase the pattern here and join the Sew Along!


    Strippy Improv Holiday Sew Along Schedule:

    Thursday, November 18th - Intro and Fabric Selection

    Tuesday, November 23rd - Make a block

    Tuesday, November 30th - Make a block

    Thursday, December 2nd - Make a block

    Tuesday, December 7th - Make a block

    Thursday, December 9th - Assembly

    Tuesday, December 14th - Alternate options

    Thursday, December 16th - Finishing

    ********************************************************************

    It's Day 1, so let's talk fabric selection.

    You can go in so many different fabric directions for this project - traditional Christmas, modern, whimsical...

    The keys? 

    1) Choose a non-white or light fabric for the block backgrounds so the pieced strips don't show through. 

    2) Select a background color that contrasts with the strip colors for your blocks. For example, if you make a tree block, you don't want the background fabric to be green, or your tree won't show up. 

    3) Aim for high contrast for the skinny frames around each block. This creates definition between your blocks and your sashing/border fabric. 

    4) Raid your stash for the strip pieced sections of each block. The scrappier, the better!


    The first time I made this project, I used black/silver tonals and jewel tones for a more modern look (see above). This time, I couldn't decide, so I'm sharing two different fabric combinations. Which do you like better? What will you use? I can't wait to see! Share your fabric choices on Instagram using #strippyimprovholiday so we can all see!


    If you're new here, welcome! I hope you'll stay and look around a bit. 
    If you like what you've seen here, you can also find me:
    To find all of my quilt patterns, visit my Etsy shop
    Find me on IG here.
    Find me on Facebook here.
    Sign up for my newsletter in the right-hand sidebar or here
    (You'll receive a free pattern for my Diamond Drama quilt (below) as a thank you!)