Monday, August 14, 2023

Star Bows in Teals

Hello! It's time for my 3rd quarter Benartex Ambassador project, and I was lucky enough to get to play with the Prismatics collection. 
It features jewel tone colors in gorgeous watercolor prints, and the teal and lime colorway is right up my alley! (Though I used both colorways in a full-size version of my Star Bows quilt...keep scrolling to see, and to find a coupon code for the pattern!)


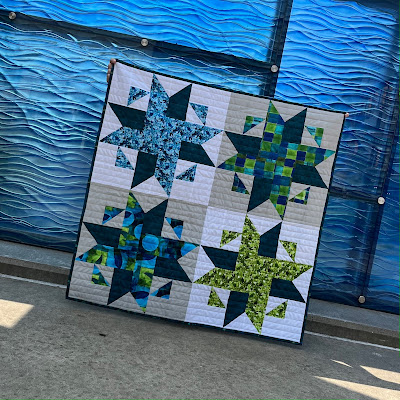
I chose to use this more controlled palette in a four-block wall hanging version of my Star Bows quilt pattern. The key is to choose a good contrasting color for the additional set of points. These huge stars measure 18" square, so four blocks makes a nice sized quilt! I like adding extra interest by alternating background colors as well. 

This patchwork-type print is my favorite from the collection: 


I found this fantastic sculpture downtown to use for photos of this quilt. See the full photo below this one. 

I need to come back with a larger quilt! 

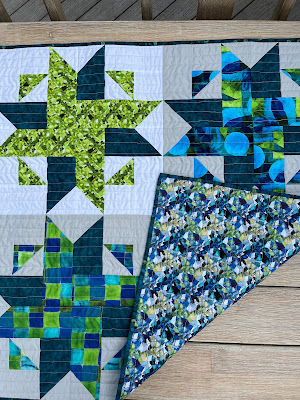
I chose to do simple straight-line quilting so that the star blocks would shine. The quilting creates great texture! 


Isn't that print on the back fun? It reminds me of stained glass. 


This 36" square version I'm holding is made using just four blocks - a FQ of each print, plus the dark teal for the contrasting points and two background colors. 

The full quilt features 16 blocks, using both colorways: 


Which do you like better? I'm itching to make the full-size 16-block version now! :) 

The Star Bow pattern is available in my Etsy shop, and if you use the code PRISMATICS, it's 20% off through Monday, August 21st. Click here to use the code.

Get the pattern here.


Friday, August 4, 2023

The Story of a T-Shirt Quilt

A few months ago, my neighbor, Shari, called and asked me if I knew of anyone local who could make a t-shirt quilt for her son, who was retiring from the Marines. I said yes - me. :) 

Here's a look at the finished quilt - keep reading for the story. 

I met Shari at our local fabric shop to choose fabric. Because this was a military quilt, we started out looking at red and blue fabrics. But none of the patriotic fabrics really appealed to us. And then I found the sashiko-inspired fabric. Brad was stationed in Japan for quite a while, and this print reminded Shari of his time there. Bonus points that it was a beautiful fabric! 

Then we started looking for sashing fabric and for a "filler" fabric - something I could use to enlarge any t-shirt blocks that weren't large enough. This particular t-shirt quilt didn't have a color theme - sometimes if a quilt is made up of college or high school shirts, they're primarily in school colors, and that makes choosing fabric easier. We opted for red for the sashing for 2 reasons: 
1. It brought us back to the patriotic color scheme when paired with the navy border print
2. It helped to really define the blocks, most of which were neutrals or darker colors. 

The last print we chose was the navy stars. Here, we went opposite of the red - the goal was to choose a print that would blend in with the t-shirt colors rather than stand out. The navy frames the smaller blocks without calling attention to itself. 


After I prepped all the t-shirt blocks (see my Thermoweb post for more details, including the two must-have products I recommend to make a t-shirt quilt), it was time for layout. Purely by luck, I had the same number of blocks with and without the navy frame, so I decided to alternate them. I think this helped to blend the navy frames into the background even more. 


Here's the quilt top assembled before quilting. 

My machine quilter, Diane, did a great job as always. She did an allover loops design for the blocks and then red stars in the sashing. In the photo below, you can also see one of the blocks I assembled from small t-shirt squares. Most of these were from polo shirts and motifs printed on sleeves. I cut them as large as I could, and then sewed them into a four-patch. Add a navy frame, and this block was the same size as the rest. That's an easy way to use smaller elements in your quilt. 

I really love how the red sashing makes the blocks pop.

Here are Tom and Shari with the finished quilt. They traveled to their son's house for the retirement party and presented the quilt to him there. I was honored to be part of such a special project! 

Want to learn more about making t-shirt quilts? Head over to Thermoweb's blog to read tips on how to make your own.