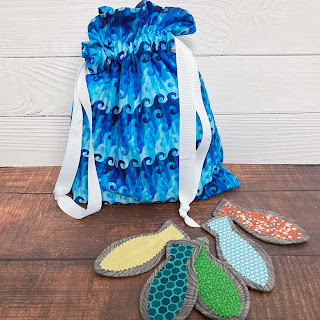
It's almost spring break, and for many families, that means road trips. I shared a Go Fish! travel game tutorial over on the Thermoweb blog - you can find it here. Below, I'm sharing the tutorial to make a simple lined drawstring bag to hold your game pieces. Enjoy!
Let's get started!
You'll Need:
1/2 yard blue print for outer bag
1/2 yard blue tonal for lining
2 yards coordinating 1"-wide grosgrain ribbon
Fabric marking pen
I was happy to find this blue "wave" fabric--perfect for a fish game!
Cutting:
From blue print:
(2) 12" x 14-1/2" rectangles
From blue tonal:
(2) 12" x 14-1/2" rectangles
Make the Bag:
1. Sew the (2) 12" x 14-1/2" blue print pieces along the bottom short edge (If your fabric is directional, make sure the print is facing "up" - aka away from the bottom seam on both sides. Sew (1) 12" x 14-1/2" blue tonal piece to the opposite short edge of both the bag front and back as shown.
2. Fold the pieced strip in half right sides together along the seam between the bag back and front, aligning the edges. The raw edges of the two lining pieces should match up as well. Pin edges to secure. Using a fabric marking pen, measure 2" from the top edge of the lining/outer bag seam and mark a line as shown. Measure and mark a second line 1-1/2" from the first line.
3. Stitch around the three open sides, leaving a 4" opening for turning on the short edge of the lining pieces. DO NOT stitch between the marked lines on either side of the bag front. Backstitch as you approach the line to secure, skip over that 1", and then backstitch as you start again. 
4. Turn the bag right side out through the lining opening. Stitch the lining opening shut. Tuck the lining into the bag and press the top seam. Poke bottom corners out as needed.
5. Using the existing marked lines on the bag front (re-measure and redraw if you can't see them), continue the lines onto the back side of the bag as well. Stitch on each of these marked lines, being careful to only stitch through one side of the bag at a time. (It will be as if you are stitching a tube--you'll be stitching through the bag front and lining sandwiched together, and rotating as you sew, until you're stitching through the bag back and second lining piece.) This creates the casing for the drawstrings. If you stitch through all layers at once, your bag won't open!

6. Cut the ribbon into (2) 1-yard lengths.Using a safety pin, feed one ribbon into the casing from the left side. Feed through the bag front and bag back, exiting on the left side. Tie the ends together in a knot. Feed the second ribbon into the casing from the right side. Feed through the bag front and back, exiting on the right side. Tie the ends together in a knot.
Your drawstring bag is complete! Use it to store your Go Fish! game pieces and felt pond. Missed that tutorial? Head over to Thermoweb's blog to find it.
Happy traveling!