Monday, October 30, 2023

Falling for Gnomes Mug Rug Set

Happy fall! 
I've been playing with these fun Falling for Gnomes fabrics - aren't they perfect for fall?!? This fabric was designed by Andi Metz for Benartex, and I really wanted to make something using those panel blocks. 


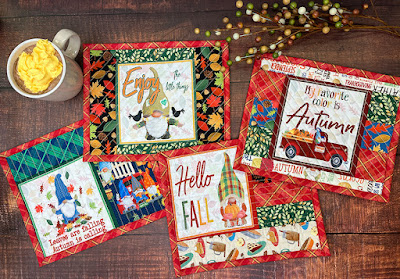
I created a mug rug set using the panel blocks, and a fabric basket to hold them. Find the tutorial for the mug rugs here. Keep reading for the fabric basket tutorial!


I used two fat quarters for the basket, plus binding fabric. 

You'll Need: 
2 fat quarters
1/4 yard binding fabric
Heatnbond Lite Fusible Adhesive
Heatnbond Heavyweight Fusible Interfacing
Heatnbond Basting Adhesive

Let's get started! 

Cutting:
From each fat quarter: 
(1) 13" x 15" piece

From the binding fabric:
(2) 2-1/4" x WOF strips

From the Fusible Adhesive:
(1) 13" x 15" piece

From the Fusible Interfacing:
(1) 13" x 15" piece

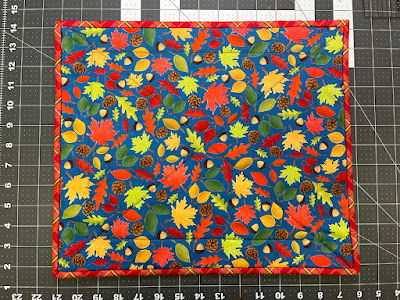
Making the Fabric Basket
Step 1 Layer the lining right side down, interfacing, fusible adhesive, and outer basket piece right side up. Fuse the interfacing to the lining and fuse the fusible adhesive to the outer basket piece. Use basting spray to join the pieces together.

Step 2 Stitch a diagonal line from corner to corner to secure the layers together. Mark and stitch a line 1-1/2" in from each edge to create a "frame" (this will be the bottom "corner" of the basket). 

Step 3 Use the (2) 2-1/4" x WOF binding strips to bind the quilted piece.


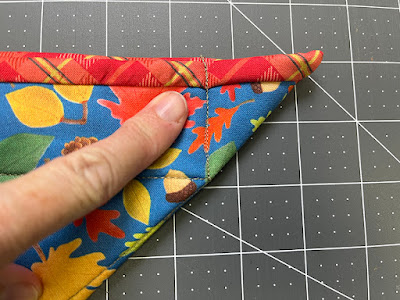
Step 4 Fold one corner on the diagonal line and stitch as shown to create a corner. Backstitch at top and bottom. Repeat on all four corners.


Here's a close-up of a corner:

Don't forget to check out the mug rug tutorial to make these cuties!

Thursday, October 19, 2023

Spooky Shirts Behind the Scenes

 If you've been following my blog for a while, you've seen a few t-shirt projects. From t-shirt trick-or-treat bags to t-shirt memory quilts, to Jojo's "Free High Fives" t-shirt, I've found that the simple t-shirt can be transformed in many ways. 

This fall, Jojo and I decided to create some Halloween-themed t-shirts. (Find the tute here!)

I don't always dress up for Halloween - mostly because by the time I'm done helping 3 boys assemble their costumes (which typically includes several mind changings and start-overs!), I'm out of time and done with creative costuming. 

Enter the candy corn t-shirt! I can be festive without day of October 31st effort. :) 


Deciding how to lay out my candy corn pieces on the t-shirt surprisingly took me the most amount of time. I just couldn't decide! Here are some of the versions I played with. 

Scattered candy corn was my original idea. But as much as I tried to rearrange it and like it, I just didn't. 


Maybe? 

This looks like a sun.

More of a kaleidoscope look. Interesting.             


                                       Or maybe a quilty star? Yep, that's it!

Jojo decided that he wanted in on the fun as well, and chose to create some spooky eyes. I think it would be really fun to make these eyes glow in the dark. I haven't seen glow-in-the-dark t-shirts, but I imagine a coat or two of craft paint could create the same effect. 


A quick note about the appliques - you can absolutely use cotton scraps for your appliques. I choose to use t-shirts (as opposed to jersey off the bolt) for a couple reasons. 

1. This means the appliques have the same amount of stretch and the same texture as the shirt itself. 

2. Sometimes the color selection of available cotton jersey is lacking. But the t-shirt aisle has plenty of choices! 

3. I now have a stash of partially cut up t-shirts in a drawer that I save for other projects. Instant jersey stash! 


And a tip - don't skip the interfacing steps for your t-shirt. Having those extra layers on the stretchy jersey makes the whole process easier. You're not fighting stretch as you stitch, and your t-shirt won't get pulled out of shape. Trust me. 

I'm part of the Thermoweb Design Team and I used three Thermoweb products for this project - HeatnBond Soft Stretch Fusible Adhesive to secure the candy corn in place, HeatnBond Lightweight Fusible Interfacing to help manage the stretch, and Pressing Paper to protect my iron and project.

Find the tutorial for both shirts on Thermoweb's blog, here.


Thursday, October 12, 2023

Strippy Improv QAL - Assembly and Finishing!

   It's week 4 of the Strippy Improv Halloween Quilt Along! Time for assembly and finishing! 

(Scroll down to the bottom for a couple single-block finish ideas!)


I finished my wall hanging using the Glow-O-Ween fabrics from Benartex. Thanks to everyone who shared their opinions on which border print to use. I ultimately chose this print because it allowed the blocks to shine the most. 

The pattern also includes directions to turn your blocks into a table runner. Here's my BOO runner from last year - so excited to have it on our table this October!


Ready to finish your project? 
I've got some tips and advice to make this process go more smoothly.


Tip 1: Matching seams. Make sure to line up the block frames and vertical sashing seams as you sew the two block rows together with the horizontal sashing strip. (Don't mind the fact that these pics are from a Strippy Improv Holiday project...I forgot to take the photo when I was assembling my Halloween wall hanging this week!)


Tip 2: Thread color. Choose a neutral thread color for machine quilting. This can seem hard to choose if, like in my pillow, you have a lighter gray block background and then a black border background. But if you choose a simple quilting design like straight lines (my go-to!), the quilting primarily provides texture and the thread color doesn't stand out. 


Tip 3: Machine quilting. Diane Oakes quilted my original Halloween wall hanging, and did a beautiful job! She switched out thread colors for different fabrics, did some echo quilting in each of the shapes, and added in that adorable spider and web! I love how her quilting enhances the blocks. 


I machine quilted my additional Halloween projects. I opted for straight horizontal lines to create texture without distracting from the design. I freehanded the lines, starting along one of the block frames, and then moved over the width of my walking foot for each line. Quick, easy and effective!


If you're a little behind on block making or just want a different type of project, below are instructions for two alternate finishes, each using one block. Enjoy! 

Pillow Finish
After I made the jack o'lantern block, I decided it would be a great pillow. I created the same 1"-wide frames around the block, and then cut 4"-wide strips for the border fabric, creating a 16-1/2" square pillow top. I added a 16-1/2" square fusible fleece square to the back side and machine quilted it. I made a same size backing square (with fusible fleece and quilting too), and then added a zipper and finished up the pillow. The pillow assembly took less than an hour. 


Trick or Treat Bag Finish


You'll Need:
1 8-1/2" square strippy improv block

Orange tonal: 
(2) 1-1/2" x 8-1/2" strips
(2) 1-1/2" x 9-1/2" strips

White spiderweb:
(1) 13-1/2" x 15-1/2" piece for bag back
(2) 3" x 18" strips for handles
(2) 2-1/2" x 9-1/2" strips for bag front
(1) 2-1/2" x 13-1/2" strip for bag front
(1) 5" x 13-1/2" strips for bag front

Black print:
(2) 13-1/2" x 15-1/2" piece for bag lining
(2) 3" x 18" strips for handles

Assemble the Bag:
1. Sew orange tonal strips to sides and then top/bottom of 8-1/2" square strippy improv block.

2. Sew 2-1/2" x 9-1/2" white spiderweb strips to opposite sides of block. Sew 2-1/2" x 13-1/2" white spiderweb strip to top and 5" x 13-1/2" white spiderweb strip to bottom to complete bag front, measure 13-1/2" x 15-1/2". 

3. Layer bag front and bag back right sides together and stitch around sides and bottom. Layer (2) black print bag lining pieces right sides together and stitch around sides and bottom, leaving a 6" opening along bottom for turning. 

4. Cut out 2" squares from bottom corners of both outer bag and lining. Box corners. Turn outer bag right side out. 

5. To make handles, lay (1) each 3" x 18" white spiderweb and black print strip right sides together. Stitch along both long edges. Turn right side out, press, and topstitch along both long edges. Make (2) handles.

6. Measure in 2-1/2" from outer bag edges and pin handle in place, matching raw edges. Repeat on bag back. Baste handles in place. 

7. Slide outer bag inside lining, making sure handles are tucked in. Match side seams and pin top raw edges together. Sew along the top outer edge. 

8. Turn bag right side out through opening in the lining. Stitch the opening closed. Topstitch along the top edge of the bag to finish. Happy trick or treating!


And that's it! I hope you enjoyed being part of the QAL! I hope you'll share photos of your project! And come back mid-November when we start the Strippy Improv Holiday QAL! 

 **************************************************************************
If you're new here, welcome! I hope you'll stay and look around a bit. 
If you like what you've seen here, you can also find me:
To find all of my quilt patterns, visit my Etsy shop
Find me on IG here.
Sign up for my newsletter in the right-hand sidebar or here
(You'll receive a free pattern for my Diamond Drama quilt (below) as a thank you!)


Need the full Strippy Improv Halloween Pattern? Purchase the digital pattern here

And mark your calendars for the Strippy Improv Holiday QAL, starting mid November! 


Thursday, October 5, 2023

Making Faces Bonus Templates

When I stitched my pumpkin blocks, I wanted them to be jack o'lanterns instead. 

Aren't they adorable?!?! I just sketched my face shapes, but afterwards I created a pdf with similar faces to these for you to use. Download the pumpkin face templates here. Enjoy!

Since my pumpkin block has a black background, I knew I could use the fused pumpkin shape I cut out of the background for my eyes, nose and mouth. Easy! 


I love how those two bats look almost like accidental eyebrows! I didn't fare quite so well with the smile--the black bat in the right tooth makes it look like that tooth has a broken edge, which I've decided work for a jack o'lantern. But...pay attention to where you place your appliques! 

I also made a second pumpkin block, so I decided to try yellow eyes, nose and mouth so that this jack o'lantern looked like it was lit up. I like them both! 


If you add a face to your pumpkin, make sure to stitch down the appliques to secure them. Since you're fusing them to a pieced surface, they'll need those extra stitches. 

Week 3 - Strippy Improv Halloween QAL

Welcome back for Week 3 of the Strippy Improv Halloween QAL! 
How are your blocks coming along? 

I finished two blocks this week - a ghost and a witch hat. 

I had fun digging through my low-volume prints for my ghost!

The lime green accent will match the frames on two of the blocks. 

Scroll to the bottom to see my four blocks together!

Let's talk tips - here are a couple more things that I hope will be helpful as you make your blocks. 

First, block background placement. Play around with your block background before fusing it down to make sure you get the best combination of fabric, and also to make sure things like the stems show through correctly. 

For the witch hat, I wanted the green accent to be above the brim of the hat. I also picked my darkest black (the star print, which has the least white, so it "reads" as the darkest) for the bottom, so it makes the bottom of the hat seem dimensional, like you're looking up it. 

Make sure your green stem starts at the top of the pumpkin body. 


Here are two "don't do it this way" examples: 

The background needs to be adjusted up so the stem aligns with the green seam. 

The background needs to be adjusted down so the green doesn't show on the pumpkin. 

Play around with your background and make sure it's exactly how you want it before you fuse in place! 


Second, if you're concerned that your background fabric is too light (especially when you're using black strips for your piecing, I have a solution for you: Fusible Interfacing. 


Before adhering the fusible web to with the traced shape to your background square, adhere a piece of fusible interfacing (I use medium weight). This makes the fabric more opaque and reduces the likelihood that the strips will show through. 

Here are my four blocks together. 
I can't wait to assemble these blocks into a wall hanging!

Meet me back here on Thursday, October 12 where I'll be talking assembly! 

Here's the QAL schedule: 
Thursday 9/21: Fabric and block choices
Thursday 9/28: Make 2 blocks
Thursday 10/5: Make 2 blocks
Thursday 10/12: Assemble and finish!

I hope you'll join in the fun! I'll be posting here on the blog and also sharing posts on IG (@quiltyzest). If you're going to sew along, use the hashtag #strippyimprovhalloween to share your block and/or fabric choices!

Ready to join the fun? Order just the digital Strippy Improv Halloween pattern here
The pattern includes 9 block choices plus both a square wall hanging and table runner option.

Wednesday, October 4, 2023

Leaves & Webs: 2-in-1 Reversible Placemats

Happy fall! 
I admit that I have 2 plastic totes packed with Halloween and fall decorations (and that doesn't count our outside Halloween decorations!). But I can't resist making more projects every year - I love this season! 

This year, I decided to make Two-in-One Reversible Placemats. They work for both fall AND Halloween, but they'll take up less space wherever you store your decorations! 


I've got a thing for fall leaves, so that's naturally what I chose for fall, browsing through my scraps to find the "best" leaf colors. And spider webs - how fun are they?! Here are the supplies i used. I'm a Thermoweb designer, so the tutorial for this project is featured on their blog

A quick note about the construction of these placemats - I opted to use an orange flange as the accent border. The flange gets quilted down, but I do like the little add-on of dimension it creates. 


Another look at the Leaf side of the placemats:


And the Web side: 

 Head over to Thermoweb's blog to find the tutorial!

Monday, October 2, 2023

Quilts of Valor Presentation

Tonight I got to be part of something very special: a Quilts of Valor presentation to my former neighbor, an Army Ranger.

Me, Tom and the quilt

 
It all started back in spring when Tom's wife, Shari, asked me if I knew anyone who made t-shirt quilts, as she wanted to have one made for her son, who was retiring from the Marines. I volunteered. Then she asked if I knew anything about the program to get quilts to veterans, as her husband, Tom, was also a veteran. I said I could help with that too - I had recently designed a free pattern for Benartex's American Spirit collection, and I actually had the fabric in hand to make the quilt. 
the reveal

Several sets of hands were instrumental in this project. My mom, Lindy, offered to piece the quilt. My friend and machine quilter, Diane, quilted it. My roles were easy - I initiated the project, I bound the quilt, and I added the label. :) And then of course, I had the honor of awarding the quilt. 

Tom's son was in town for a visit, so this week became the perfect time to present Tom with the quilt. Family and close friends met for dinner at a local brewery, and my family and I showed up with the quilt. 

Shari, daughter Stacey, Tom, and son Brad

I explained the mission of Quilts of Valor, told the backstory of the quilt, and awarded it to Tom. The entire group was so excited and touched to see Tom honored this way - I still have tingles thinking about it!
Showing the label

Label close-up


I've heard about Quilts of Valor for years and know many quilters who have participated in this worthwhile program. It was a pleasure and an honor to play a role in making this quilt and awarding it. Huge thanks to my mom and Diane for doing the hard work of creating the quilt! 


A few more photos of the American Patchwork quilt: 

Can't beat a Michigan farm field, barn, and cloud-studded sky!

Love the little details in Diane's quilting, like these stars in the sashing squares

Red block - a nine-patch variation

Blue block - Mom even made sure all the text was facing "up"!


Another beauty shot

 Thanks to Benartex and their Ambassador program for the fabric to make this quilt happen!