6 New Strippy Improv Block pages
(supplemental to the original Strippy Improv Holiday pattern; these additional pages do not tell you how to make the blocks; they simple include additional block templates. For full instructions, please refer to the Strippy Improv Holiday pattern).
***************************************************************************
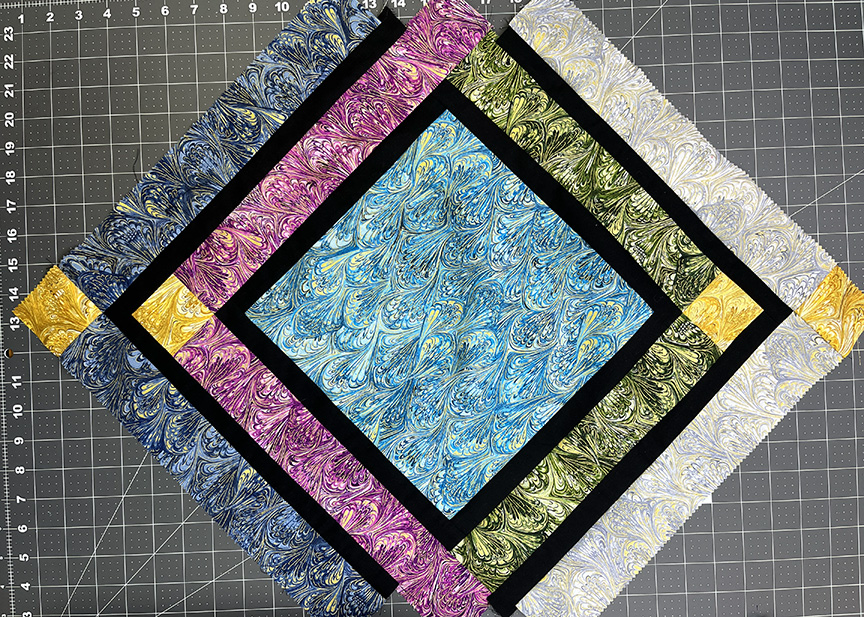
Venetian Marble Strip Runner
I created this herringbone-style table runner using a Strippie pack of Benartex's Venetian Marble collection. I love all the rich colors and details in these prints!
You'll Need:
(1) Strippie pack (or eleven 2-1/2" x WOF strips)*
1 FQ Peacock Venetian Marble
5/8 yards black solid, includes binding
1 yard backing fabric
*If you're using yardage instead of precuts, you'll need 1/8 yard cuts of 11 different colors).
Cutting:
From the Strippie pack:
(20) 2-1/2" x 14" strips (2 from each of 10 colors)
(10) 2-1/2" squares from yellow strip
From Peacock FQ;
(1) 10-1/2" square
From black solid:
(3) 2-1/4" x WOF strips for binding
(16) 1-1/4" x 14" strips
(2) 1-1/4" x 12" strips
(2) 1-1/4" x 10-1/2" strips
Make the Runner:
Step 1 Sew 1-1/4" x 10-1/2" strips to opposite sides of (1) 10-1/2" Peacock square. Sew 1-1/4" x 12" strips to the remaining sides.

Step 2 Select your first strip color. Sew (1) 2-1/2" x 14" strip to the top of the pieced square from step 1, aligning ends at the upper right corner. Sew (1) 2-1/2" yellow square to the end of the second 2-1/2" x 14" strip. Sew to the right side of the pieced square.
Your piece should look like this. Note that the green ends extend beyond the pieced square; trim them even with the edges of the pieced square.
Step 3 Each time you add a pair of pieced strips, check to ensure that your corner is still square. This will keep your table runner straight as you build it. If your runner starts to go wonky, pick out the stitches of the strip just added and try again. A little wonk early on adds up to alot of wonk as you add more pieced strips!
Step 4 Select your second strip color and add to the opposite corner of the pieced square, following step 2. Trim ends of pink strips even as shown.
Step 5 Sew 1-1/4" x 14" black strips to opposite sides of the runner, starting at the yellow square end. These strips are shorter than your pieced square unit, and that's ok. Sew 1-1/4" x 14" black strips to the top and bottom, starting at the yellow square end.
Step 6 Repeat steps 2-4 to add a pair of pieced strips to each side of the runner.
Step 7 Repeat step 5 to add 1-1/4" x 14" black strips to both ends of the runner.
Step 8 Continue adding pieced strips and black strips to the runner until you have 5 colored strips on each side of the center square.
Step 9 We're going to give the runner an initial trim before quilting; a final trim will happen after quilting. Carefully trim each long side to 1" past the outer black point (see 2nd photo below). Use multiple rulers and 45-degree lines on the rulers to ensure that you are trimming straight.
Step 10 Layer the runner top with backing and batting and quilt as desired. I quilted a wavy line in each black strip and back and forth loops that mimicked the fabric in the colored strips.
Step 11 After quilting, trim long edges of runner to 1/2" past the center square corners. Again, use multiple rulers and refer to 45-degree lines on rulers to ensure your runner is trimmed straight.
Step 12 Use the (3) 2-1/4" x WOF black strips to bind the runner. Enjoy!
***************************************************************************
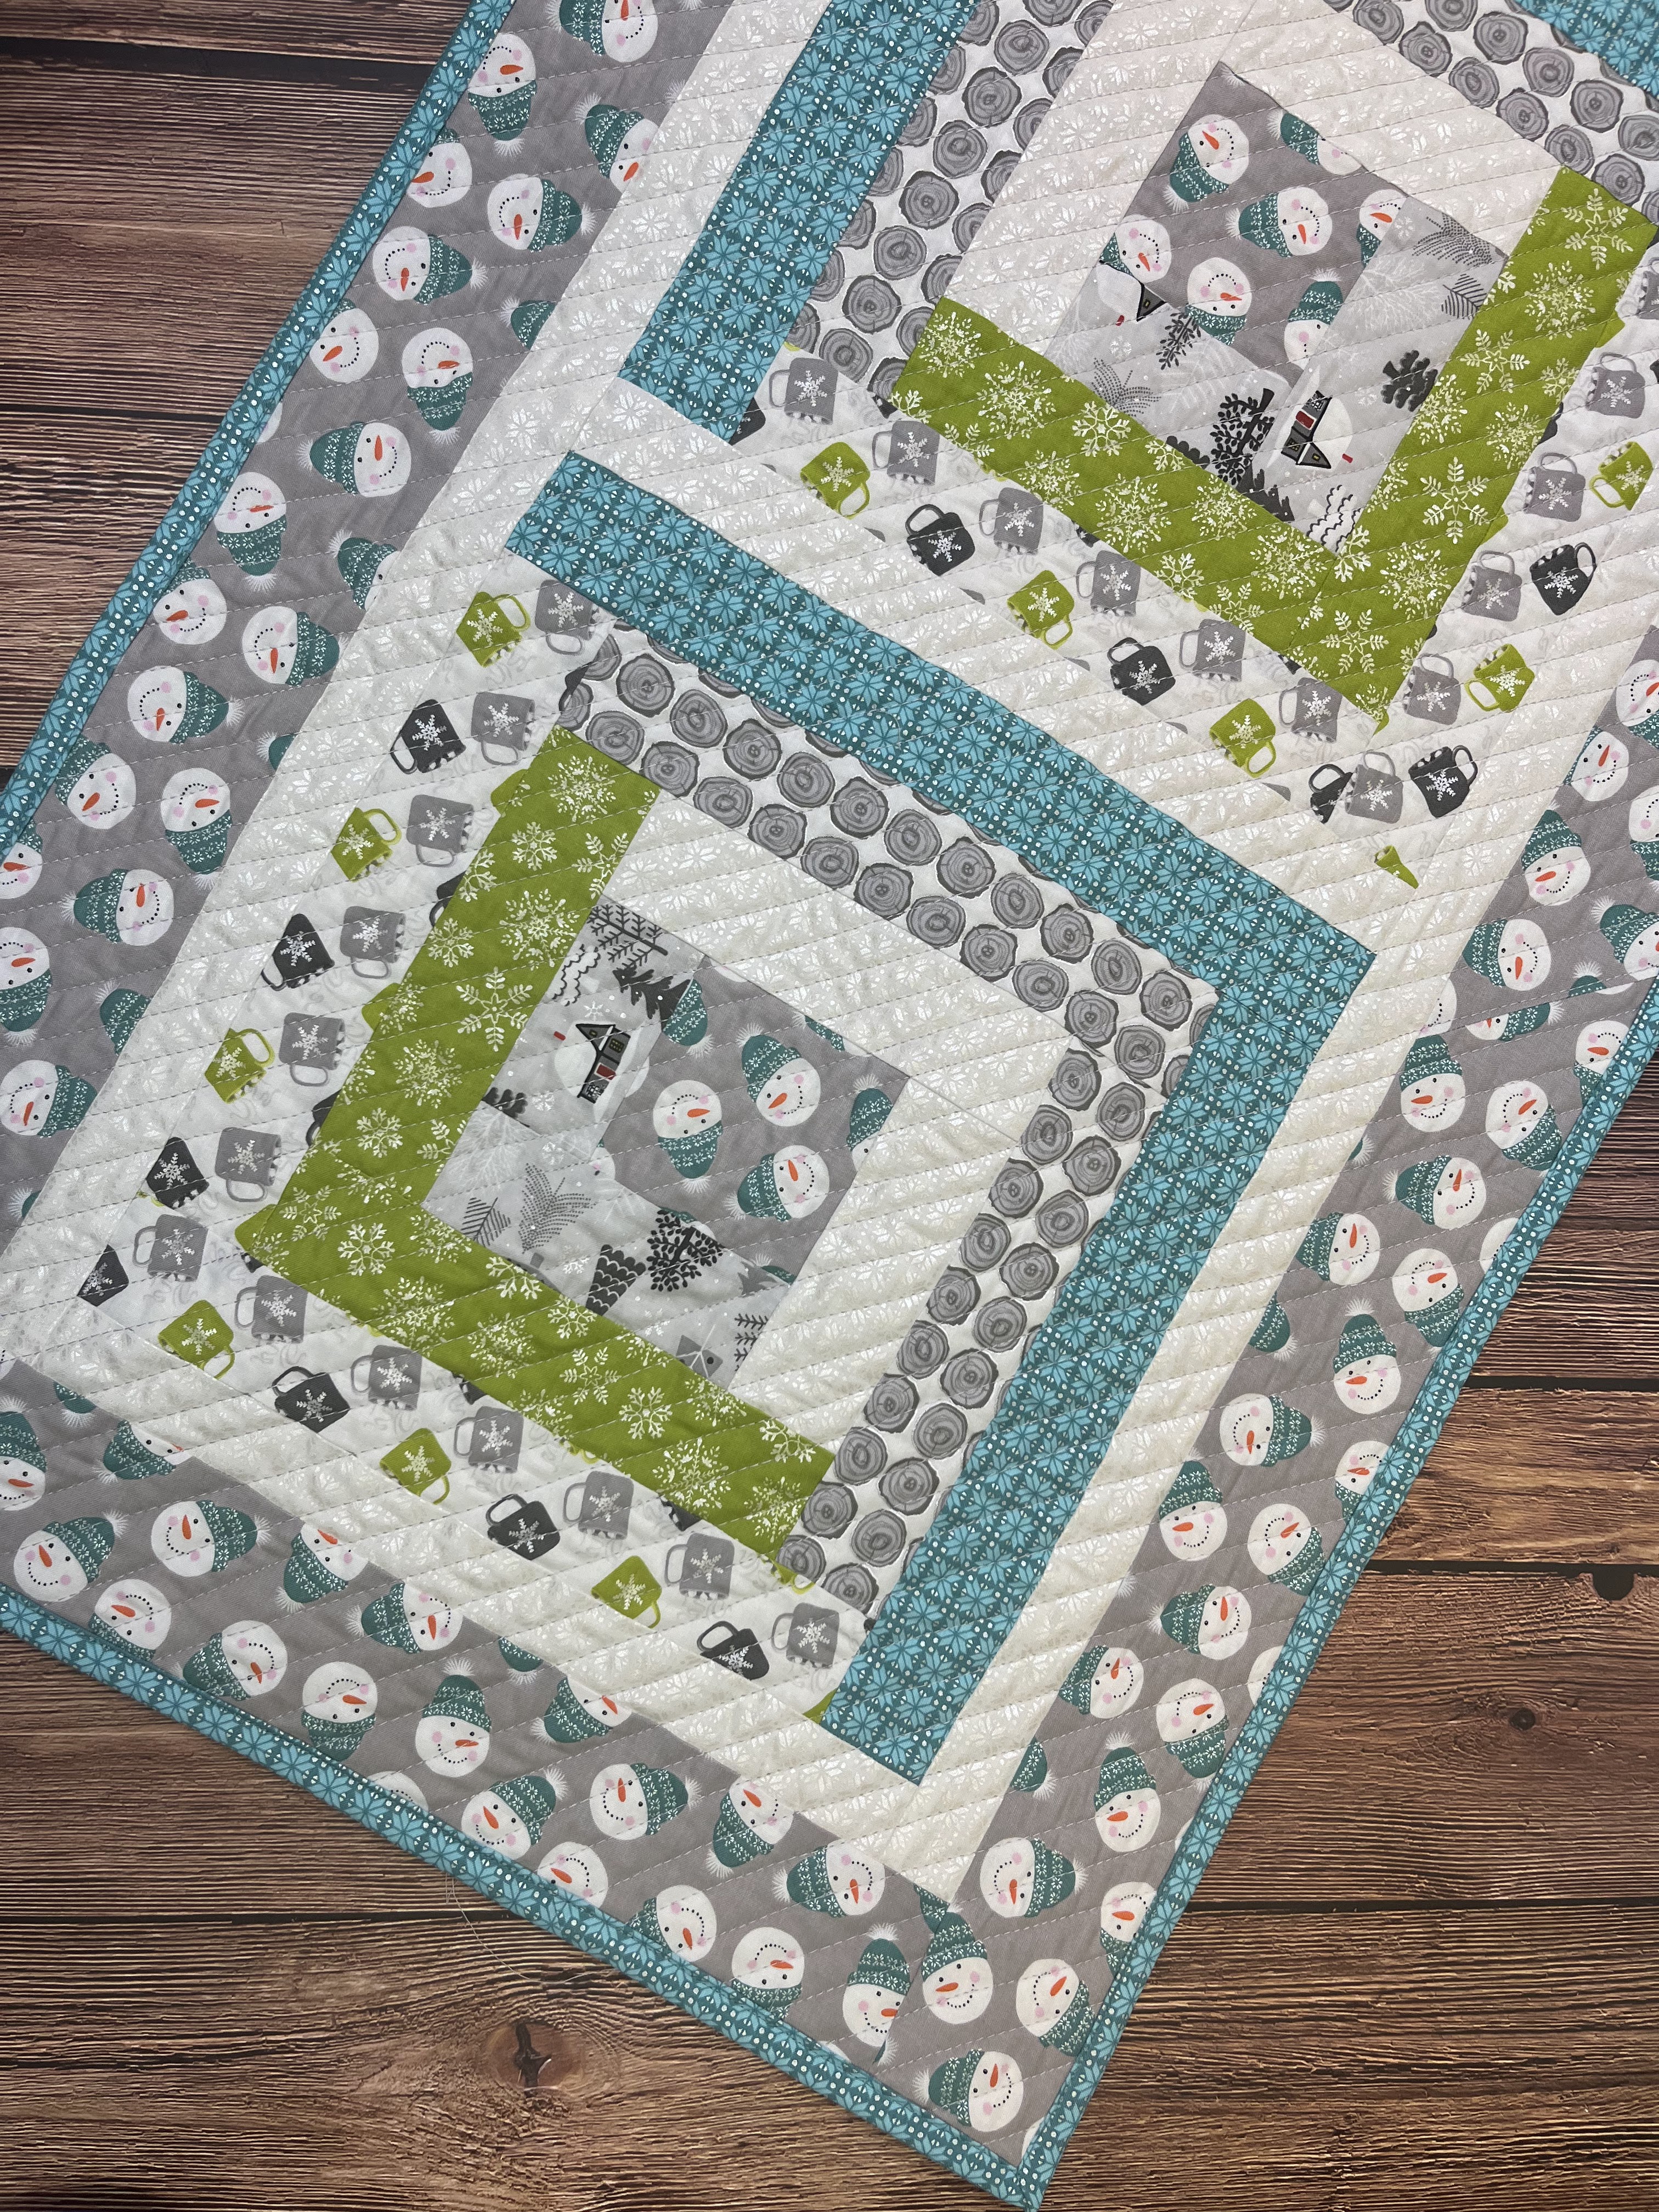
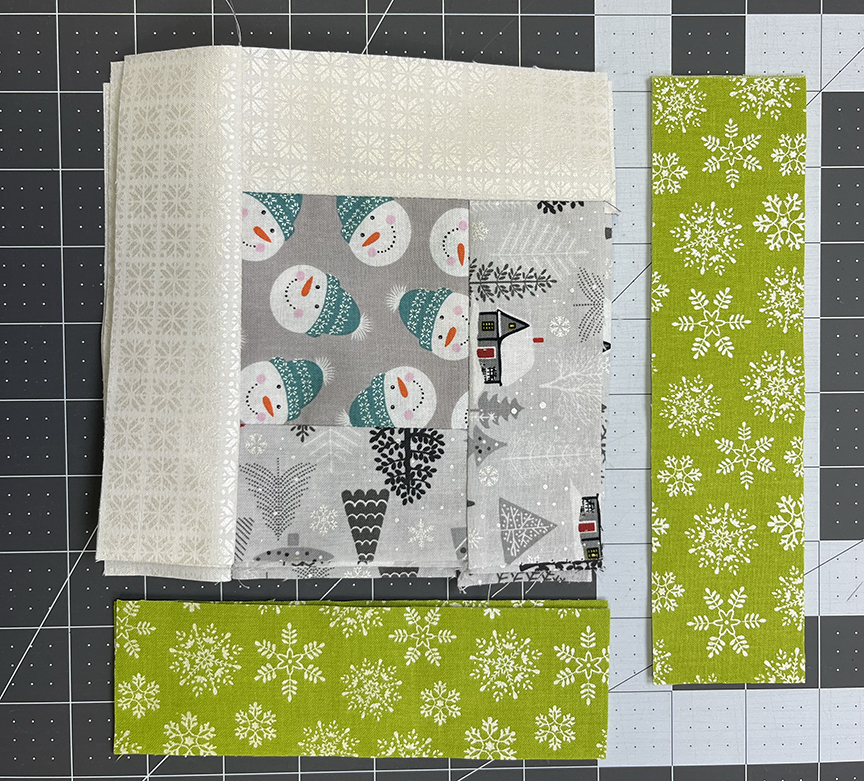
Nordic Cabin Log Cabin
I used the Nordic Cabin prints by Cherry Guidry to create a wintry runner that can decorate your table all season long!You'll Need:
1/8 yard grey house print
1/2 yard white tonal
1/4 yard lime snowflake
1/4 yard gray log print
1/4 yard mug print
1/2 yard teal tonal
2/3 yard snowman print
Backing fabric
Batting
Cutting:
From the grey house print:
(4) 2" x 5" pieces
(4) 2" x 3-1/2" pieces
From the white tonal:
(8) 2" x 6-1/2" pieces
(4) 2" x 5" pieces
(5) 1-1/2" x WOF strips for sashing
From the lime snowflake:
(4) 2" x 8" pieces
(4) 2" x 6-1/2" pieces
From the gray log print:
(4) 2" x 9-1/2" pieces
(4) 2" x 8" pieces
From the mug print:
(4) 2" x 11" pieces
(4) 2" x 9-1/2" pieces
From the teal tonal:
(4) 2" x 12-1/2" pieces
(4) 2" x 11" pieces
(3) 2-1/4" x WOF binding strips
From the snowman prints:
(4) 3-1/2" squares
(5) 3" x WOF strips for outer border
Make the Runner
Step 1 Lay out all of your pieces on your cutting mat so you're ready to assemble the log cabin blocks.
Step 2 Sew the 2" x 3-1/2" grey cabin piece to the bottom of (1) 3-1/2" snowman square. Sew the 2" x 5" grey cabin piece to the right side. Note: Press seams away from the center throughout the assembly.
Step 3 sew the 2" x 5" white tonal piece to the top and the 2" x 6-1/2" white tonal piece to the left.
Step 4 Sew the 2" x 6-1/2" lime snowflake piece to the bottom and the 2" x 8" lime snowflake piece to the right side.
Step 5 Sew the 2" x 8" grey log print to the top and the 2" x 9-1/2" grey log print to the left side.
Step 6 Sew the 2" x 9-1/2" mug print piece to the bottom and the 2" x 11" mug print piece to the right side.
Step 7 Sew the 2" x 11" teal tonal piece to the top and the 2" x 12-1/2" teal tonal piece to the left side to complete the 12-1/2" square block. Make (4).
Step 8 Noting block orientation, sew the blocks together alternating with (5) 1-1/2" x 12-1/2" white tonal strips. Measure the runner length. Sew the remaining 1-1/2" white tonal strips short ends together and cut (2) strips to that length. Sew to opposite sides of the runner.
Step 9 Cut (2) 3" x 14" snowman print strips and sew to short ends of the runner. Measure the runner length. Sew the remaining snowman prints strips short ends together and cut (2) strips to that length. Sew to opposite sides of the runner.
Step 10 Layer the runner backing, batting, and runner top and baste layers. Quilt as desired, trim backing and batting even with the quilt top. Use the (3) 2-1/4" x WOF teal tonal strips to bind the runner.
Enjoy!
***************************************************************************
Stan the Snowman!
This fun wall hanging is easy to make, and it's a combination of piecing and applique. It measures 30" x 40", so it's a quick sew, and a perfect winter wall hanging. I've put together a video tutorial and a pdf tutorial for Stan the Snowman.
Download the pdf here.
Watch the video tutorial here.
Sew a Stan to live at your house!

***************************************************************************Colorku-Themed Block
(Quilt Block Mania, December 2021)
This block is inspired by the game Colorku and is assembled using reverse applique techniques. Read more about this block here.
You'll Need:
(9) 5" gray squares (I used a variety of tonal prints for added interest)
(9) 4-1/2" squares in a rainbow of colors
HeatnBond Lite Fusible Web
Download the template here.
Making the Block
Step 1: Trace the circle template 9 times onto the paper side of fusible web, leaving 1" between circles.
Step 2: Cut out each circle from the fusible web, leaving 1/2" around the outer edge of the circle.
Step 3: Fold each 5" gray square in half in both directions and press to mark the center points. Do the same with each circle, aligning the circle edges as you fold (not your cut line). Align the center marks and fuse the circle to the wrong side of the gray square. Repeat on all 9 gray squares.
Step 4: Cut out each circle, beginning by cutting a slit in the center of the circle. IMPORTANT--you want to keep the negative shape--the gray square withe circle cut out of the center--this is different from most applique!
Step 5: Repeat for all 9 circles. If you used different grays, arrange the circles to find the 3x3 layout you like best. At this point, I realized that my middle gray square was way too light...
Step 6: So I replaced it! :)
Step 7: Choose your color order for the circles and match each color to its gray square.
Step 8: Remove the paper backing from the gray square and position it on top of the colored square. Fuse in place. 
Step 9: Repeat with remaining squares.
Step 10: Square up each unit to measure 4-1/2" square. Hint: You want approximately 3/4" on each side of the circle.
Step 11: Stitch units into rows and then join the rows to complete the 12-1/2" square block. Finish the block by topstitching around each gray circle edge using a decorative or straight stitch. This helps to secure the fused edge. Enjoy!
***************************************************************************
Log Cabin Goes Wonky
(Quilt Block Mania, September 2021)
This block takes the traditional log cabin and makes it wonky with some improv cutting!
You'll Need:
(1) 2-1/2" square for block center (dark purple)
(1) 2-1/2" x WOF strip for log round 1 (citrine)
(1) 2-1/2" x WOF strip for log round 2 (blue)
(2) 3-1/2" x WOF strips for log round 3 (lilac)
Making the Block
Step 1: Cut a 3" long citrine piece. Lay it on the 2-1/2" dark purple square, choosing a slight angle (tilting either left or right). The angle should change approximately 1/4" from top to bottom.
Step 2: Stitch along the citrine edge using a 1/4" seam allowance and trim purple as shown.
Step 3: Press the unit open. Turn 90 degrees on cutting board and choose an angle for your ruler (can tilt either left or right). Trim edges on desired angle.
Step 4: Cut a long citrine piece slightly longer than your unit from step 3. Align citrine piece along cut angled edge and stitch using a 1/4" seam allowance.
Step 5: Press unit open. Turn 90 degrees and choose an angle for your ruler. Trim edges on desired angle. Tip: The bigger your angle, the wonkier your block. Cut a citrine piece longer than your freshly cut edge, align, and sew using a 1/4" seam allowance. Press open.
Step 6: Rotate the unit 90 degrees, choose an angle, and trim. Add a citrine piece to this last side and press open. Tip: Cut each piece at least 1/2" longer than the piece it's being added to to allow yourself some wiggle room.
Step 7: Trim the last side on your desired angle.
Step 8: Continue in the same way, adding blue strips for the second round of logs.
Step 9: Add the lilac strips for the third round of logs. After lilac logs are added, trim block to measure 12-1/2" square.
***************************************************************************Stitch and Flip Mountain Block tutorial
(Quilt Block Mania, July 2021)
This block combines basic stitch and flip flying geese techniques with a little improv piecing! It was inspired by my summer vacation out west - we drove around so many mountains!
You'll Need
The block consists of four different sizes of flying geese units. Below is a list of the unit sizes and quantity, as well as the pieces you'll need for each unit. You'll also need white, brown and green scraps for the improv piecing (approximately (1) 2" x WOF strip of each color), plus (1) 2-1/2" x 12-1/2" blue piece for the top border.
(1) A unit: (1) 4-1/2" x 8-1/2" brown/green piece and (2) 4-1/2" blue squares
(3) B units: (3) 3-1/2" x 6-1/2" brown/green pieces and (6) 3-1/2" blue squares
(2) C units: (2) 2-1/2" x 4-1/2" brown/green pieces and (4) 2-1/2" blue squares
(4) D units: (4) 1-1/2" x 3-1/2" brown/green pieces and (8) 1-1/2" blue squares

Making the Block
Step 1: To create the wonky background, begin with (1) 3-1/2" x 6-1/2" brown piece. Position a green scrap strip on a diagonal as shown. Note: Keep in mind that we'll be adding stitch and flip corners to transform this background piece into a flying geese unit, so make sure the strip you're adding will show after the corners are added.
Step 2: Stitch along the angled strip using a 1/4" seam allowance. Use a ruler to trim extra brown fabric to 1/4" past the stitched line as shown.
Step 3: Press the angled strip open. Use a ruler to see where your trimmed background rectangle will be and decide if you want to add a second angled strip.
Step 4: Position a while scrap strip on the unit from step 3 as shown. Again, position the ruler so you can ensure that some of the strip you're adding will show once corners are added. When you're satisfied with placement, stitch using a 1/4" seam allowance. Note: You don't have to add a second angled strip. Feel free to stop at one angled strip, and then skip to step 6.
Step 5: Trim the excess green strip off and press added strip open.
Step 6: Trim unit to measure 6-1/2" x 3-1/2". You may want to play with ruler placement before trimming. Note: See how my white strip doesn't extend to the edge of my background unit? That's okay because this area will be trimmed off when I add stitch and flip corners.
Step 7: Draw a diagonal line on the wrong side of (2) 3-1/2" blue squares. Position (1) marked square right sides together on the pieced background rectangle. Stitch on the drawn line, trim seam allowance to 1/4", and press corner open (making a stitch and flip corner!).
Step 8: Repeat on the opposite corner with the remaining marked square.
Step 9: Here's the finished Unit B flying geese unit. Make the indicated number of each unit as listed below, varying your improv piecing on each "mountain." Trim as follows:
Make 2 of unit A: 8-1/2" x 4-1/2"
Make 3 of unit B: 6-1/2" x 3-1/2"
Make 2 of unit C 4-1/2" x 2-1/2"
Make 4 of unit D: 3-1/2" x 1-1/2"
Here's what my improv backgrounds looked like before adding the stitch and flip corners.
Step 10: Lay out the units into rows as shown.
Row 1: (1) 2-1/2" x 12-1/2" blue strip
Row 2: (2) 6-1/2" x 3-1/2" B units
Row 3: (1) 6-1/2" x 3-1/2" B unit and (4) 3-1/2" x 1-1/2" D units
Row 4: (2) 4-1/2" x 2-1/2" C units and (1) 8-1/2" x 4-1/2" A unit
Step 11: Sew the units into rows and join the rows to complete the quilt block.Happy mountain making!***************************************************************************
Shining Star Block tutorial
(Quilt Block Mania, May 2021)
A word about fabric choices--what makes this block work is contrast. Choose a "darker" fabric for the star ray, background and star half on the right, and "lighter" fabrics for the star ray, background, and star half on the left.
Materials
6" x 15" piece of two blue fabrics
4" x 5" piece of two red fabrics
13" square of gray and white solid
Thermoweb Heat 'n Bond Lite fusible web
Download the templates here.
Step 1: Draw a diagonal line on the wrong side of the 13" white square. Layer it right sides together with the 13" gray square.
Step 2: Stitch 1/4" on each side of the drawn line. Trim apart on the line and press both HST units open. Trim to measure 12-1/2" square. Note: You'll only use one per block. Set the second one aside.
Step 3: Trace the template shapes onto the paper side of fusible web. Label the template shapes so you fuse the shapes to the correct fabric. (Ask me how I know this!)
Step 4: Cut out shapes 1/4" past the drawn lines. Tip: Straight lines are key here, especially along the diagonal seam line. Use a rotary cutter and ruler to ensure your cuts are as straight as possible. Fuse the shapes to the correct fabric.
Step 5: Cut out each shape on the drawn line. Position the star ray shapes on the HST unit, aligning the raw edges. Make sure the two rays meet in the middle. Fuse in place.
Step 6: Position the stars in place and fuse to secure.
Step 7: Add a decorative stitch to secure applique pieces in place.
Want to see what this block looks like in a quilt?
Head over to the Shining Star blog post.
***************************************************************************
Rain on the Window Block tutorial
(Quilt Block Mania, April 2021)
I created this block based on the idea of bargello (but not actually assembled that way) and is meant to abstractly represent looking through a rain-soaked window. Read more about it here. 
You'll Need
8" x 5" piece of dark green
8" x 4-1/2" piece of medium green
8" x 4" piece of cream
9-1/2" x 3-1/2" piece of dark blue
9-1/2" x 4" piece of medium blue
9-1/2" x 3-1/2" piece of light blue
9-1/2" x 3" piece of lightest blue
Step 1: Sew together the dark green, medium green and cream pieces as shown.
Step 2: Subcut (5) 1-1/2"-wide strips from the strip set. Tip: align a horizontal line on your ruler with a seam line to make sure your strips are straight.
Step 3: Sew together the four blue pieces as shown.
Step 4: Subcut (4) 2-1/4"-wide strips from the strip set.
Step 5: Lay out the (5) green strips alternating with the (4) blue strips. Sew the strips together to complete the block.
Tip: Because of how narrow these strips are, I had the best luck when I pressed the vertical seams open rather than to one side. It helps the block to lay flat with less distortion.
And there's your block! Head over to
my original blog post to see a digital rendering of what a whole quilt would look like using this block.
***************************************************************************
Improv Bloom Block tutorial
(Quilt Block Mania, March 2021)
I created this improv block using angled strip piecing. Quick and easy, and just like in nature, every block will be different!
You'll Need
Strips of 6-8 fabrics (approximately 2-1/2" x WOF)
1/4 yard muslin for foundation
Cutting
From the scraps:
2-1/2" x 10" strips (some can be shorter for near the corners--you'll see I've pre-trimmed some in the step photos)
From the muslin:
(4) 6-1/2" squares
Step 1: Position one strip right side up on a muslin square, making sure it covers the corner as shown.
Step 2: Position a second strip right side down, matching raw edges. Make sure strip extends beyond the square, even when strip is flipped open (like in step 3 - do as I say, not as I did!). Stitch using a 1/4" seam allowance.
Step 3: Press the second strip open.
Step 4: Add a third strip. Angle the strip to create some wonkiness. Make sure the new strip doesn't go past the long raw edges of the second strip. Stitch using a 1/4" seam allowance along the third strip.
Step 5: Fold the muslin square back, out of the way. Trim the second strip even with the third strip as shown.
Step 6: Press the third strip open. Your strip should extend beyond the muslin square, unlike mine.
Step 7: Add a fourth strip in the same manner. Vary the angles of each strip you add. Continue trimming the exposed strip after adding each.
Step 8: Here's what my piece looks like after adding five strips.
Step 9: Continue adding strips until the entire muslin square is covered.
Step 10: Flip the pieced unit over and trim to 6-1/2" square. You don't have to line up exactly with your muslin square, but make sure the pieced fabric extends at least to the edge of your 6-1/2" square.
Step 11: Repeat steps 1-10 to make four quarter units.Step 12: Lay out the four quarter units into a square and decide on a placement you like. Sew into pairs. Press the seam allowance open (since it'll be thick). Sew the pairs together to complete the block.
And you're done! Easy, isn't it? And no two blocks will look the same.
***************************************************************************
Lucky Squares Block tutorial
(Quilt Block Mania, February 2021)I created this scrappy block using improvisational piecing techniques. It's a great way to try out improv on a small scale, and your block will be completely unique!
You'll Need:
Scraps of 4-6 colored tonals
Fat eighth each of white and gray tonal
Cutting:
From the colored tonals:
A variety of 1", 1-1/2" and 2" squares
From each of the white and gray tonal:
A variety of 1", 1-1/2" and 2" strips, each 14" longStep 1: To get started, select a few strips and randomly cut them into two or three pieces each. Position a square of the same width in between each cut section. These will be your improv pieced rows. Tip: Vary your cuts so the lengths and positions are different in each strip.

Step 2: Sew the pieces in each row together and press seams.
Step 3: Continue making pieced strips. Vary the number and color of squares in the rows for variety. It's okay to have some rows without piecing as well. Remember, because of seam allowances, you'll need more than 12-1/2" tall worth of pieced strips. I used 11, but your number may vary based on the widths of your strips. Arrange the strips in an order you like, considering square positions and color and strip width and color. Remember you can rotate pieced strips as well. You can also shift strips slightly from right to left, because they're all longer than 12-1/2".
Step 4: Position a 12-1/2" square ruler on top of your strips. Adjust any strips as needed to make sure the edges extend at least 1/2" beyond the sides of the ruler. You may need to add onto a strip to make it long enough (like I had to in the bottom row). You can do this by adding a square at the end or cutting the strip and inserting the square somewhere into the middle of the strip.
Step 5: Here's the trick that makes assembly go smoothly! Use a fabric marking pen to draw a line on all strips, roughly in the center of the block. (My line here is digital--my marking pen line didn't show up in the photo.) Piece the strips together in pairs, matching up the marked lines as you sew. The ends of your pieced strips will all be different--we'll trim those later! Continuing joining the pieced strips until your block height is at least 12-1/2".
Step 6: Here's my block with all rows sewn together. Audition your 12-1/2" square ruler placement on the pieced block, making sure that fabric extends on all sides of the ruler. (Note that mine doesn't--I didn't notice this until I got to this step, so I added the corner colored square on at this point). Trim the block to measure 12-1/2" square.
That's it! You're done! This technique would be fun to use for a mug rug or a mini quilt, or you could make multiple blocks and assemble them with or without sashing to create a table runner or quilt. I hope you enjoyed this little improv exercise. Thanks for stopping by!
***************************************************************************
Romantic Patchwork Heart tutorial
(Quilt Block Mania, January 2021)
I created this fun no-sew block using four different pink fabrics, fusible web, and some very random cut lines. It's fun to make, and every block is unique. I hope you'll give it a try!
You'll Need:
Note: This technique actually creates pieces for four blocks. If you only want to make one, you'll need just one background square and you can toss the remaining pink pieces. Three (or four!) blocks would make a fun table runner or wall hanging.
(4) 10" squares in varying pinks
(4) 13" background squares
Fusible web
Step 1. Download the half heart template here. You'll need to trace it onto a folded piece of paper to make a full heart.
Step 2. Trace (4) full hearts onto the paper side of fusible web. Cut out loosely beyond the heart shapes.
Step 3. Fuse the heart shape to the wrong side of the (4) 10" pink squares. Cut out each on the line to create (4) hearts. Remove paper backings.
Step 4. Layer the hearts on top each other with right sides facing up. Position a ruler on top the heart stack and cut the hearts approximately in half, but on an angle. Keep all pieces stacked.
Step 5. Now comes the fun part! Continue cutting the heart stack in different directions to make a variety of cut shapes. Try to avoid tiny pieces. My heart has 11 different pieces--yours can have more or less. But I wouldn't do too many more, unless you really like puzzles! :)
Psst...I've got a quick timelapse video showing how I cut these over on IG. Head over and take a peek.
Step 6. Fold the 13" background square in half in both directions and crease to find the center. To make your first heart block, choose one of each shape, varying the fabric choices. Position your cut heart pieces into the finished shape on the background square, centering as much as possible. Leave a small gap (1/8" to 1/4") in between pieces. When you're happy with the placement of all pieces, use the iron to fuse in place.
Step 7. Use a decorative stitch to secure pieces in place, or plan to secure in place during quilting. Square up block to measure 12-1/2" square.
Step 8. Repeat steps 6 and 7 to make three more heart blocks! If you want them even scrappier, you can start with more pink squares. You can create one block for every pink square used. Imagine an entire quilt of heart blocks like this - so much fun!


Thank you for sharing this wonderful pattern. And thank you for the clear directions.
ReplyDeleteWhat a great pattern. I might try a smaller version for mug rugs.
ReplyDeleteThat's a great idea! I'd love to see a picture when you do.
DeleteLove this block, I feel like it’s something I could venture out on doing too, I’m kind of a new quilter who has not ventured much. But 2021 is my year to try new things quilting. Thank you.
ReplyDeleteGo for it! What's great about this block is that it's very low stakes and low effort. Have fun!
DeleteA new twist....I LOVE IT!
ReplyDeleteGlad to hear it!
DeleteThank you for accepting my request for the newsletters. Also for the free pattern. Just read this one of the heart tutorial. Sounds like fun. will make it soon i am sure.
ReplyDeleteYou are welcome! Enjoy!
DeleteIs there a link to download the March Quilt Block
ReplyDeleteEnjoyed this last newsletter
ReplyDeletepost, love the tutorials, on the blocks. Several, I will make for sure. It is spring, but right now in NL, Canada we are getting lots of RDF--rain, drizzle and fog.
Can't figure out how to download the ColorKu block. The links don't work. Please advise. CUTE block.
ReplyDeleteHi Pamela,
DeleteThere isn't a block pattern to download - the directions to make the block are just presented as a tutorial on this page. Hope that helps!