
When I saw Benartex's new Buzzworthy fabric line, I knew I could create some fun zip pouches. You can never have too many, and they make great gifts.

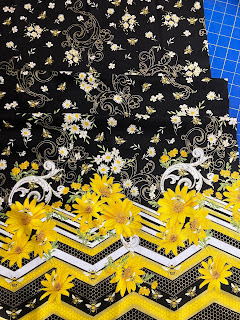
Here are the fabrics I chose to work with. There are a few prints I didn't use in these two zip pouches. Do you know what that means? I can make more! You can see the full collection here.

This border stripe fabric is what won me over--I knew I could fussy cut it so the fabric would do all the work--no piecing necessary to make a gorgeous, detailed zip pouch!
Daisy Zip Pouch
You'll Need:
1/2 yard border stripe
1/2 yard lining fabric (I used the black bee fabric)
1 coordinating zipper, at least 12" long
(2) 12-1/2" squares HeatnBond Fusible Fleece
A quick tip on zippers--I have so many - I found two to use for these pouches in my stash. If your zipper is too long--no problem--don't go out and buy a shorter one. You can cut it down to size (but don't cut yet--I'll show you how and where in the pouch instructions).
Cutting:
From the border stripe:
(2) 12-1/2" squares
Note: I used my 12-1/2" square ruler to "audition" which part of the border stripe I wanted for my pouch front. I kept my fabric folded in half, with selvedges matching, so my backing square came out of the opposite end of the fabric.

From the lining fabric:
(2) 12" squares
Making the Zip Pouch:
Step 1 Fuse each fusible fleece square to the wrong side of a border stripe square (from now on called the outer square).
Step 2 Machine quilt each square as desired--I did straight horizontal lines, about 1" apart. Square up each to measure 12".
Step 3 Layer an outer square right side up. Position the zipper on top, right side down, and align top edges. Position a lining square on top, right side down, and pin in place. Using a zipper foot, stitch along the zipper, which is sandwiched between the outer and lining squares. Note: When you reach the zipper head, stop with the needle down and move the zipper head back to where you've already stitched.


Repeat on the lining side.

Step 9 Matching the side and the bottom seam, pinch corner and pin. Stitch using a 1/4" seam allowance to create a boxed corner. Repeat on opposite outer bag corner and both lining corners.


Honeycomb Boxy Pouch
You'll Need:
1/2 yard black/white honeycomb fabric
1/2 yard zigzag stripe for lining
(2) 11" squares HeatnBond Fusible Fleece
(1) 1" x 12" piece of fusible interfacing
1 coordinating zipper, at least 12" long
A quick note before I begin--I actually had a completely different plan for a second pouch. But then I found the goldenrod zipper in my stash and knew that I could pair it with the black and white honeycomb print for a boxy, modern little bag.


Step 3 Fuse each fusible fleece square to an 11" honeycomb square. Quilt as desired. Note: I did a crosshatch pattern. Square up both outer pouch pieces to measure 10-1/2".

Step 4 In the same way as for the first pouch, attach the outer pouch and lining pieces to opposite sides of the zipper.


Step 5 Fold the pieces with outer pouch pieces right sides together and stitch along the edge opposite the zipper. Zigzag stitch to secure raw edges.

Step 6 Fold the strap in half and position the raw edges on the edge of the seam from Step 5. Pin and then baste the strap in place.

Step 7: Pin the side edges of the pouch to each other, aligning the zipper and the bottom seam line in the middle. Make sure the zipper is at least halfway open! Stitch along both side edges. Note: Stitch slowly when you encounter the bulky area by the zipper. Zigzag stitch the raw edges.

Step 8: Using the same method as in the first pouch, cut out 2" squares from each corner and stitch to box the corners.


Step 9: Turn the pouch right side out. Enjoy!


Málaga Casino & Resort - Mapyro
ReplyDeleteFind your way around the 충주 출장안마 casino, find the best place to play and 강원도 출장샵 get out 전라남도 출장샵 of here, and try our online 포항 출장안마 casino app. 경상남도 출장안마